Search engine optimization, organic traffic, search ranking, business SEO – if you’re a business owner, chances are, you hear those words all the time.
Typically it’s from a digital marketer trying to sell you something.
But how can you know if an SEO agency is legit?
By knowing a little about search engine optimization yourself.
In this article, we’ll break down SEO for small businesses and teach you all you need to know to get started on optimizing your website for Google and other search engines.
Chapter 1 – What is SEO
You’ve created this wonderful website…
Now, you need people to visit it to buy your products or services, to learn about your nonprofit or NGO, or to read your blog.
Sure, some people may visit your website from links on social media posts or by typing in your URL, but to really be successful, you’ll need to bring traffic from search engines.
But where to begin? There are countless search engines, from the well-known giants like Google, Yahoo, and Bing.

But, there are also other lesser-known search engines such as Ask.com, Netscape, Dogpile, DuckDuckGo, and the list goes on.
To add even more confusion, as a website owner, chances are you’ve received spam-like emails offering (for a nominal fee), to list your websites in scores of search engines, including those mentioned above.
And maybe, you even replied to some of those emails, and paid to have your website listed, but have yet to see results.
We’re here to tell you that you can probably forget about most of those obscure search engines like Netscape and HotBot.
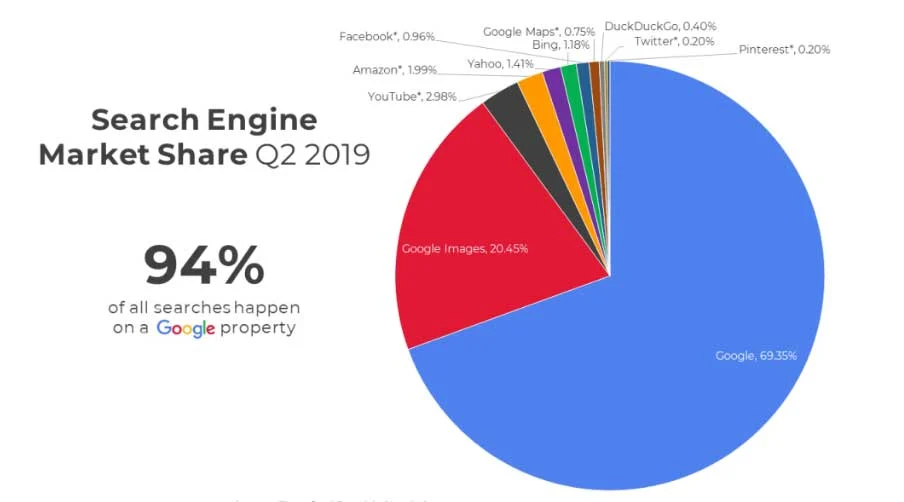
Instead, we suggest that you only focus on the Big 4 – Google, YouTube, Bing, and Yahoo.
Those four alone account for 70.6% of all website traffic (SparkToro)
Throughout this super easy SEO guide for small businesses, We’re going to define terms that you need to know, and walk you through every step that you can take to improve your website’s traffic.
Our motivation for this guide is simple – We want to see small businesses succeed.
In this guide, there will be no fluff or magical solutions.
The only information we will include is that which we’ve learned (through years of experience and lots of training) is necessary.
Of course, it would be beneficial for you to continue your education. The SEO landscape changes daily.
But, this guide should certainly give you what you need to begin your SEO journey.
For best results, your website should be using the WordPress Content Management System (CMS) platform.
In our first chapter, let’s look at some important information before we begin.
- SEO definitions
- How search engines work
- The best tools for DIY SEO
Search Engines, Indexes, Sites – What’s the Difference?
First, let’s discuss some important search definitions.
Search Engine: A system that collects pages from the web, saves them in a massive database, indexes the information, and provides a method for people to search through the data.
Search Site: A website where users can search for information on the web.
Search Index: The system containing all the information that the engine has collected and searches.
How Do Search Engines Work?
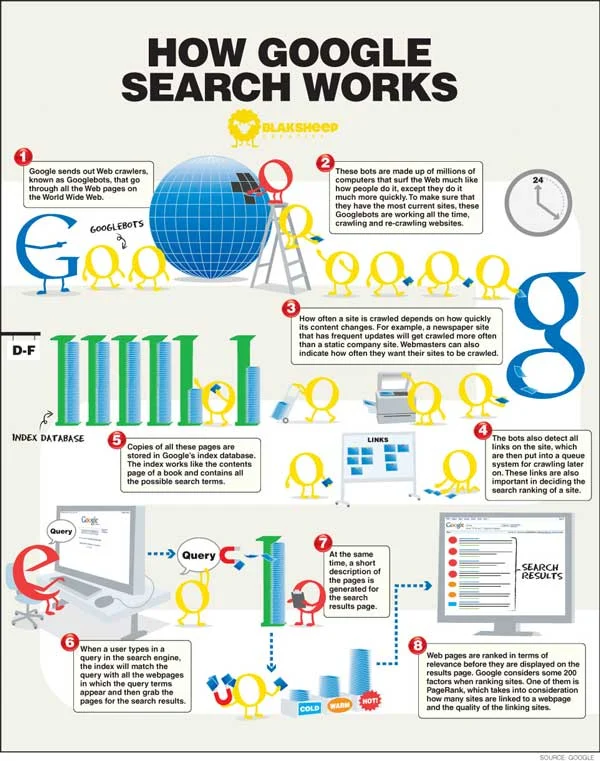
Search index companies own a large network of computers which use software known as “spiders”, “search bots” or “robots” to “crawl” and read the information (or content) in each web page’s URL.
Next, these companies use complex algorithms to index the content read in each page and attempt to rank it appropriately in search results.
Sometimes, these companies don’t even crawl the full page, instead, they only capture specific information such as titles or anchor text, meta descriptions and keywords, and that’s what goes into the big database (or index).
Now, you’re probably already asking yourself, why bother with search engines?
Why should SEO be a part of your marketing strategies?
In 2020, search engines are one of the most important tools in your marketing belt for attracting new web traffic.
Consider this:
- There are over 75,000 searches happening on Google every second (Internet Live Stats)
- Over 3.5 billion searches are performed daily on Google (Ardor SEO)
- 92% of all mobile and tablet search traffic comes from Google. (Net Market Share)
- 4 in 5 consumers use search engines to find local information. (Google/Ipsos MediaCT/Purchased)
- 15 percent of the millions of active US web users performed at least one or more searches in a day, 45 percent performed at least one query in a week, and 68 percent performed one or more queries that month. (Jumpshot/Moz)
- 76 percent of people who search on their smartphones for something nearby visit a business within a day and 28 percent of those searches for something nearby result in a purchase. (Think with Google)
- 75% of people never scroll past the first page of search engines. (Advanced Search Ranking)
Here’s a secret: Search Engines don’t want you to know exactly how they work. Otherwise, it would be too easy to use shady (Black Hat) tactics to create pages filled with content that exactly match how each bot crawls the pages.
The Best SEO Tools
Let’s squash a popular myth: You don’t have to know HTML in-depth to be successful.
There are hundreds of tools on the internet today that will help avoid the use or need for custom HTML.
We’re going to equip you with the tools and skills needed to optimize and rank your website(s).
The most obvious tools:
- a basic understanding of the internet
- an internet connection
- a website
Remember, specific changes made to a website affect your overall rankings.
You can improve (or decrease) your website’s ranking by simply changing your title tags, meta descriptions, metatags, and keyword usage.
That’s why it’s important that whoever your company’s designated person to implement your company’s SEO efforts has a basic knowledge of SEO tools and tactics.
As we go along, we’ll show you what tools are required when and where, and what terms you need to know to ensure SEO success.
Chapter 2 – Organic VS PPC Marketing
Before we get knee-deep into teaching you search engine optimization, you need to first learn what “search results” mean.
At the risk of sounding snarky, search results are simply a combination of results, from a specific search performed in a search engine.
Obviously, different search terms (queries) will produce different search results.
For example, a search for seafood will show you results from a “local index” whereas a search for the “American stock market” will give you a broad search result.
Search engines analyze the search terms that you input the best that they can and attempt to provide you the most relevant information based on that term (or terms).
Next, the search engines display possible matches on what’s called search engine results pages (or SERPs as the cool kids say).
SERPs change all the time and get more complicated with every Google update, so it’s best to stay on top of them.
Organic or Pay Per Click?
The most common types of search results today are organic and PPC (Pay per Click).
Look at the image below for the difference between the two.
Let’s use the term “Home Inspector” as an example for looking at the differences between Pay Per Click and Organic search results.

Blue Square – PPC (Pay Per Click) results from Google Adwords
Green Square – Google Snack Pack (aka Map Pack)
Red Square – Organic (or Natural) Search Results
For now we’ll focus on the PPC and organic search results.
Google uses something called “google bots” to retrieve results from the “organic-results index”.
Pay Per Click results work a bit differently here.
All of the big 3 search engines, Google, Yahoo, and Bing include Pay Per Click ads in each search result.
The company that is running these advertisements isn’t charged anything until someone clicks the ad, referred to as a “click fee”, also known as “Pay-per-Click Marketing”.
Pay-per-Click advertisements are usually placed at the top of search results (although some searches have no advertisements).
It’s important to note that there are two important categories of advertisements:
- Simple text ads (“Google AdWords” index)
- Shopping or product listing ads (“Google Product Listing Ads” index)
There is much debate about PPC ads: some users never click the ads, while some always do, and ignore the organic results.
Some ads (including ads in other search engines) provide great results for specific searches while some may not provide any value at all.
Local Results
If you’re a small brick and mortar business, local results are probably the most important search results index.
Local search results often take up more space as compared to other result indexes and appear above organic search results, though below PPC advertisements.
You should seriously consider fine-tuning your SEO strategies for local search results, especially if your audience is within your own geographical area.
Let’s refer back to our image from earlier:
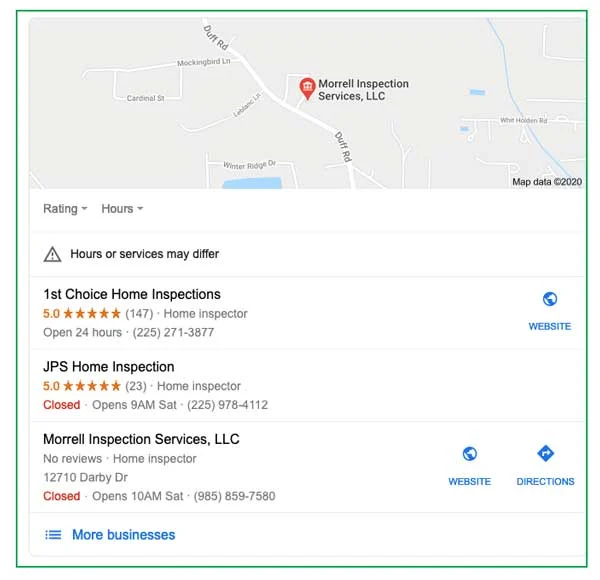
Local Search Results make up for the listings outlined in green.
These are Google Maps listings, often referred to by Google as the “Snack Pack”.
But, your business will only appear there if you’ve properly set up your Google My Business profile (GMB). Don’t worry, we will show you how to set up a GMB profile in a little bit.
The below image is the results for the query, “web design Denham Springs.”
Well, look at that! Here we are right there at spot one.

With proper Local SEO, in a 2-month time-span, we were able to get our listing not only on the first page of Google but also the #1 Google Organic Listing and #1 Snack Pack listing.
We’ll show you more about proper Local SEO techniques as we move on.
Since we at BlakSheep Creative primarily focus on small businesses, 9 times out of 10 we are building Local SEO strategies.
Because of this, we have become well versed in how Google’s (and other search engines’) algorithm updates affect small businesses.
Local results can be affected by your search query type, deciding whether to show shopping/product results and news results from your area or region.
And depending on your search query type, videos will populate a quarter of returned search results. Consider creating something like an explainer video to give searchers an idea of the services that you offer.
By understanding the differences between different search query types, you can have a better grasp on which specific local keywords you want your website to rank for and how it’s listed in the search results.
Humans are visual learners. Having a search result return with an image with its listing can dramatically increase your chances of that listing being clicked on as compared to the listing below yours.
These are called Rich Snippets and are a little more involved, so we won’t be going over these in this class, however, you can contact us if you’d like to know more, or watch for future articles on them.
Quick-Tip:
- Open the internet browser of your choice preferably using Chrome or Firefox).
- Enter into the address bar “site:yourdomain.com”
- Do not use “www”, only use yourdomain.com.
For instance, if your website’s domain is “ethospt.com”, the address bar should look like this: “site:ethospt.com”.
What this does is tells you how many pages of your website are currently indexed by the search engine you are using, meaning how many pages of that domain are live, readable, and currently indexed.
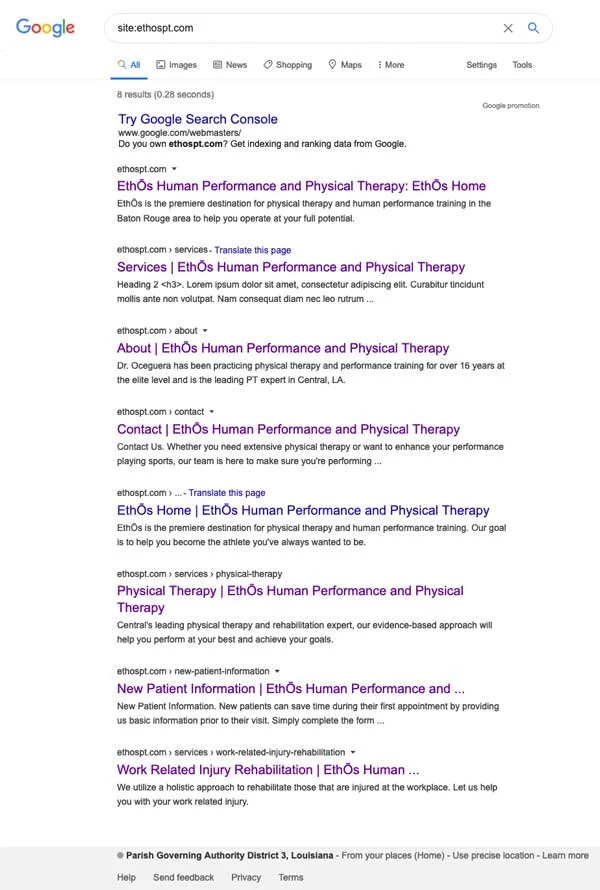
Search engines keep indexed URLs in a temporary storage space known as a “cache.”
You can use this information in the cache to determine which of your webpages (URLs) were indexed, as well as how and when they were indexed.
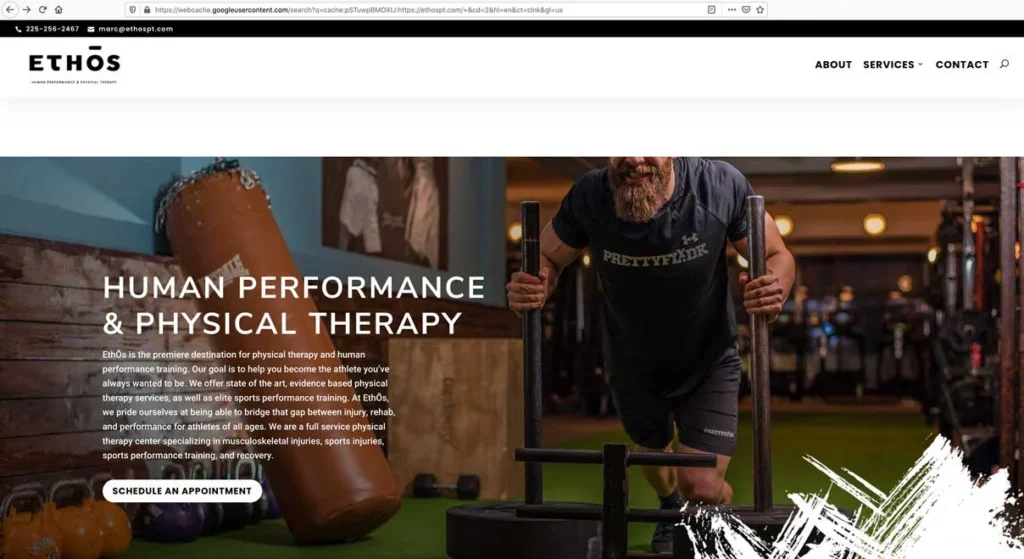
You can also view your site’s cache by using the same trick as our above but this time use the following format: “cache:https://yourdomain.com/example-page/”.
We’ll continue with ethospt.com:
Google then shows you its’ cached version of the webpage. You’ll know you’re viewing a cached version of the page by looking at the URL in your browser bar.
If the URL is super long and doesn’t match your intended URL, then it’s the cache you’re looking at. (Also note the URL https://webcache.googleusercontent.com/)
But what if the search engine doesn’t have the page?
What if you used the above tricks but still can’t find your home page or other important URLs in any of the search engines?
If it isn’t in the “big 3” i.e. Google, Bing, or Yahoo, you’ve got a serious problem.
There are two common but basic reasons why your site isn’t being indexed in the search engines:
- Search engines haven’t found your website yet. Don’t worry, you can fix that!
- Search engines found your website, but for possibly many reasons, can’t or won’t index the site:
It’s critical that these errors be figured out and studied to determine the best approach to resolving them.
Here are some of the common reasons why your site might not be indexed:
- Unreliable web server
- Robots.txt file is blocking search engines from accessing the site
- Robots meta tag is blocking specific pages
- Terrible domain name
- Unable to navigate through the current site structure/framework
There are many more possible reasons, these are just some of the most common ones
You’ve got to get your site on the search engine indexes!
You’ve heard it said: “If a tree falls in a forest and no one is around to hear it, does it make a sound?”
Your website is like that tree. If it’s up and running, but no one can find it without typing your exact URL into their browser, what good is it?
If the search engines don’t know that your site exists, they may not even be worried about finding it in the first place.
You can give them a nudge by ensuring that there are links pointing back to your website as well. (called Backlinks – remember that term).
So make sure to link to your website using social media and local directories. There are more ways to get backlinks, but we’ll just focus on these two to get your site listed.
If you have a web developer building your custom wordpress website, it’s best to reach out to them and discuss these potential errors.
Or you can always contact us, and we’ll take a look for you too.
Now, Let’s Get to Work.
Like we said earlier, this super simple SEO guide for small businesses won’t get too in-depth, or give you a lot of confusng information.
Let’s go ahead and dispel a common myth about SEO.
“SEO is too hard.”
Wrong! Anyone can do it
Just remember that SEO It’s actually a long-game, not a short-game – that is the biggest difference between what makes it “easy” or “hard”.
If you don’t see immediate results, don’t throw in the towel. Good SEO takes time and effort.
Although search engine optimization is getting tougher all the time, the techniques are not. Tricks that may have worked in the past are no longer good for today and there’s a good reason for that that we’ll discuss in a bit
We just want to make it as easy as possible for you, the small business owner.
So where do we start?
With your WordPress website, of course!
Up next, we are going to show you step-by-step on how to navigate the backend of your current WordPress website.
WordPress is more user and SEO friendly and has more features available to you than any other platform out there on the market today.
That’s why we use it for the majority of our web builds.
And if you use a visual builder such as Divi or Elementor, building your website will be a breeze. As of a matter of fact, we’ll give you a brief Divi tutorial in this article.

First, you’ll need to purchase and install a Divi license at Elegant Themes.
You’ll also need a reliable hosting service. Some of the most popular are Flywheel, WPEngine, Siteground, and GoDaddy.
Jump back here when you set up your new hosting services and Divi license (or already have an existing site). And we’ll keep on rolling.
Let that website simmer for a bit and let’s bounce back to learning SEO for a bit.
Getting Started with SEO
Disclaimer: Never ever trust a plain old web designer to manage your SEO project. Vet your SEO provider. Here’s some questions to ask when looking for an SEO company.
The majority of web designers will say the site they’re building is “SEO-friendly”.
And even if they do provide some basic SEO, they usually just add some tags and submit your site to search engines.
That’s fine if you don’t want to succeed. If you do want to succeed, keep on reading.
Far too often we hear from potential clients they’ve spent an excess of $5,000 or more for a custom-built website when all in return they received a website with horrible technical SEO built on a horrible framework like Wix or Squarespace. (Sorry Wix and Squarespace, you’re for amateurs and companies that don’t want results).
Step One
The first step for any SEO campaign whether it be local or national is to first identify your competitors and the best keywords for your SEO campaign.
Also, take note of what keywords your competition is ranking for.
There are plenty of tools out there that can provide you this information (and more data).
The more information you have about your competition, the better you will be able to understand and build the best strategies for your company’s website for maximum results.
“You don’t have to run faster than the bear to get away. You just have to run faster than the guy next to you.”
-Jim Butcher
Here are a few tools that we use to find all the information we need about our clients’ competitors and what they’re ranking for. (among others in our proprietary SEO analytics stack).
These same tools can be used to identify what information can work best for your website.
- ScreamingFrog SEO Spider (Download Free Version)
The Screaming Frog SEO Spider is a website crawler that allows you to crawl websites’ URLs and fetch key elements to analyze onsite SEO. The Screaming Frog SEO Spider is free, however, you can purchase a license to crawl more than 500 URLs and have access to advanced features - SEO Powersuite (Download Free Version)
SEO PowerSuite combines immense SEO capabilities and is straightforward and easy to use. The software really guides and assists you in every task. You don’t need any deep SEO knowledge, just set it up and go!
There are also lots of paid tools that you can use, Ahrefs and SEMrush are two of the most popular. Both offer free trials.
Although you can use these tools to get a leg up on your competition and find the best keywords possible for your SEO efforts, it’s best to understand that search engine optimization can still be very labor-intensive and you may not see results for weeks (more likely, months).
The difficulty of search engine optimization depends on the competitive level of your desired keywords and content embedded within each page.
Some keywords are more competitive than others, such as any keywords from the real estate industry, insurance, and even attorneys.
Some keywords are much easier.
Despite search engines using complex scientific algorithms, SEO is really more art than science.
When someone tells you, “search engines don’t want you to know how they rank sites”, shrug them off, because that’s simply not true.
Well mostly.
There are 200 known ranking factors, that we know of, that every website should optimize for to see the best results.
Constant experimenting is your best bet for determining how search engines are ranking for any of the 200 known ranking factors in your industry or niche.
But don’t worry about that, we don’t have to outrun the bear, just our competition.
Here’s a simple way to find out who your competitors are and what they are ranking for:
Pick a search engine of your choosing (preferably one of the big 3) and type in a keyword you would like to rank for in your area.
Let’s use seafood as an example.
More specifically, let’s search for seafood restaurants in Baton Rouge.

This keyword returned about 6,340,000 results in 1.11 seconds. Included in this search are the top 3 Google Map “snack pack” listings and the top 10 organic search results for seafood restaurants in Baton Rouge.
Using this method is not the best since Google thinks most of the results provided match the search query; realistically, the majority of these results don’t have the keyword seafood restaurants in Baton Rouge listed anywhere in their pages.
Instead, try this:
Enter the same keyword in the same search engine but this time put the keyword in quotation marks like so “seafood restaurants in Baton Rouge” and hit enter.

You should see the dramatic differences between the two search results, right? Here’s what the new search provided us:
The keyword “seafood restaurants in Baton Rouge” gave us about 36,900 results in 0.70 seconds instead of 6,340,000 results and 0.41 seconds faster.
Why?
Because Google is looking for ”exact match” queries and is ignoring pages with scattered words across countless several pages.
There’s a problem though with these two methods though.
They don’t tell you exactly how well the pages are optimized.
Keep in mind, you’re not trying to compete with every single page with that keyword, just the ones that are optimized.
If the pages you have found from your exact match query are not well optimized, you have a much better chance at ranking number one for seafood restaurants in Baton Rouge (if not the number one listing).
So how can you tell if the pages from the exact match queries are optimized? Simple.
Use the tools we provided above.
What To Look For In A Search
Now perform a search for your desired keyword and look for the following:
PPC Advertisements:
Most of the time, there are 3-4 advertisements at the top of the page. These advertisements tell us that people are paying for specific keyword advertisements and that means people are paying for that keyword’s search engine optimization.
Local Results:
Some search engines interpret specific searches as local results. Both your browser and search engine try to determine your location to display information about a local business in your area, relevant to the desired keyword.
Bold and Highlighted Words:
When the results show bold and highlighted words based on your desired keyword, this typically means a well-optimized page.
Complete Phrases:
Basically, the more frequently you see the full phrase from your desired keyword listed, the more competitive the keyword is.
Are your keywords competitive?
If you find your desired keywords are highly competitive, don’t get discouraged. it doesn’t mean you won’t ever rank. There are plenty of methods that will help rank your desired keyword(s) and we will discuss those later on.
But what if you have a more optimized website filled with awesome content, and your competition still outranks you?
Chances are, they have a better link profile. But, that’s ok, you can use those tools mentioned above to spy on their backlinks to find out:
- How many links they have.
- The quality of the backlinks.
Don’t worry, we’ll cover that in a little bit.
For best results, you have to know about highly targeted keyword phrases, also known as “long-tail keywords”. Remember, some keywords are more competitive than others, right?
If you find that yours are too competitive, find keywords that are less competitive.
Using our previous example, we don’t want to just say seafood restaurants. Let’s use more specific information such as seafood restaurants in Baton Rouge, or seafood restaurants in Denham Springs and so on.
You can also focus on more specialized keywords such as fried seafood restaurants in Baton Rouge or fried seafood restaurants in Denham Springs, etc…
Don’t use misspelled keywords as a strategy as that may hurt your rankings over time.
Now let’s learn how to do competitor analysis using the tools above.
How To Do A Competitor Analysis with Screaming Frog SEO
We highly recommend downloading the ScreamingFrog SEO Spider software for this next section. Jump to the next section once you’ve downloaded and opened the software.
Let’s use the previous example “seafood restaurants in Baton Rouge” as our target long-tail keyword.
Enter the same keyword into a search engine such as Google and ignore the directory and map listings. Let’s jump on down to Milfords on Third. (those first few are large directories and not worth taking on at this time, also, they may not match the user’s search intent and not get clicked on by searchers anyways).
Now let’s take a look at Milford’s on Third. Use the following steps below to learn how to do competitor analysis on “Milford’s on Third”.
Enter the URL in the address bar at the top and hit Start. Your screen should look like the image below.
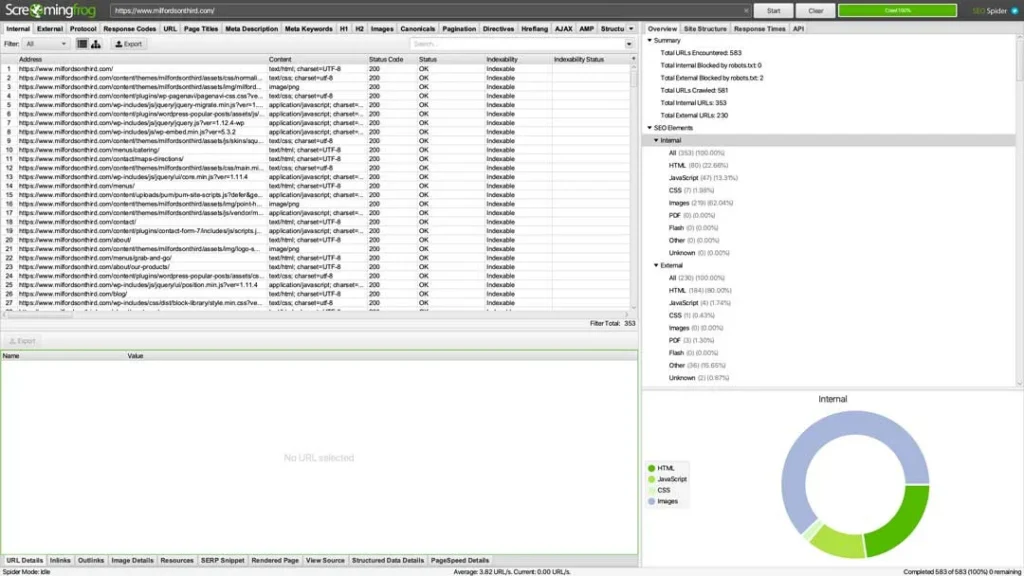
Right now we are going to focus on the SEO Elements tab on the right of the screen.
Click the black arrows next to each one of the other categories to minimize it.
Minimize Internal, External, Protocol, URI, Directives, Hreflang, Ajax, Custom, Analytics, Search Console, and Link Metrics.
Response Codes
The response codes section in Screaming Frog tells us what pages are active on the site, and which ones are experiencing issues.
While there are numerous response codes out there, right now we’re looking at those with a 404 status code.
A 404-page error basically means there is a link on a page that goes nowhere – it is not properly linked to anywhere else on the site.
You’ll want to make fixing these 404s a high priority.
To see what pages have a 404 status code, look at the “Client Error (4xx) line in the response codes sub-category and look at the URLs presented in the main screen.
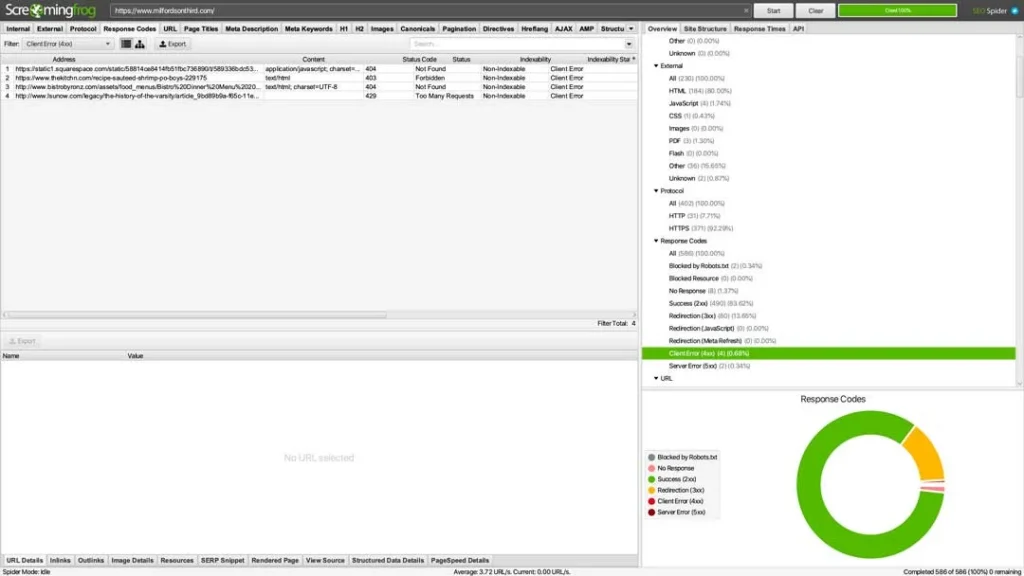
Another important section to look at is the “Blocked by Robots.txt” one you can see above the Client Error (4XX) line.
You can also use this same tool to do a quick analysis of your own website.
Page Titles
In the page title subcategory, you can view information about each page title (anchor tag), also known as “header tags”.
For now, the sections that we will focus on the most in this subcategory are Missing, Duplicate, Same as H1, and Multiple.
Let’s go over each one.
- Missing: The page is missing a title and an H1 tag in its header.
- Duplicate: This page shares the name as another page (not the same tag). You should avoid duplicate header names because Google penalizes duplicate content and tags.
- Same as H1: The page title and H1 are identical. Your page title and H1 tag should always be different.
- Multiple: This is the same concept as duplicate, but this refers to the tag and not the name. Always have only one H1 tag per page.
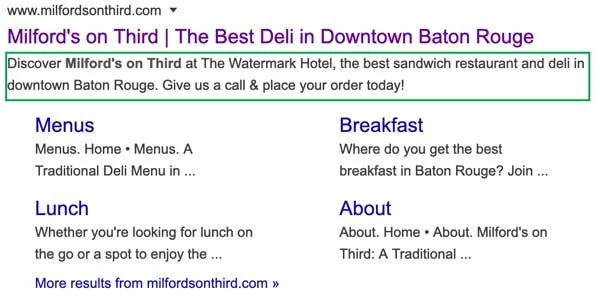
Meta Description
In the meta description group, you can view information about each page’s description (also known as “meta description”. Although meta descriptions bear no effect on SEO, they’re super important.
The purpose of a meta description for your page is simple: to get someone searching on Google to click your link. In other words, meta descriptions are there to generate click-throughs from search engines.
If you look in the image below, here’s an example of a meta description as it is displayed on Google’s search results (outlined with a green box).
H1
If you remember from earlier, each page should only have one H1.
Remember?
Congratulations, you’re already in the top 10% – this is one of the most common SEO mistakes. Sadly, a lot of so-called “SEO experts,” make it as well.
Make sure that your pages have exactly one H1, and they don’t share an H1 with another page on your website.
If you see a number in the multiple tab, click where it says multiple and look at the pages on the main column. Go through and make corrections as necessary.
Images
Google indexes your mages the same way that they index pages on your website. When you embed an image on your website, it must have “alternative text” or “alt-text”.
Alternative Text should not only describe the image but should include that page’s keyword(s) if at all possible, but don’t force it or make it unnatural.
Alternative text is critical on each and every image, as it’s what appears in place of an image on a webpage if the image fails to load on a user’s screen. This text also helps screen-reading tools describe images to visually impaired readers.
Whether you use Screaming Frog to do a quick audit of your competitor’s website, you can get a general idea of their keyword strategy, and what weaknesses you can capitalize on.
Remember, you don’t have to be faster than the bear, just your competition.
Chapter 3 – Creating a Basic Wordpress Site
In this chapter, we will be walking you through the basics of your Wordpress Dashboard, and how to use it to create a website that adheres to the best SEO practices in 2020.
So, what are the search engines looking for when they crawl your website?
Ideally, your site needs to be useful and wonderful and something that people will naturally want to link to.
Let’s get started.
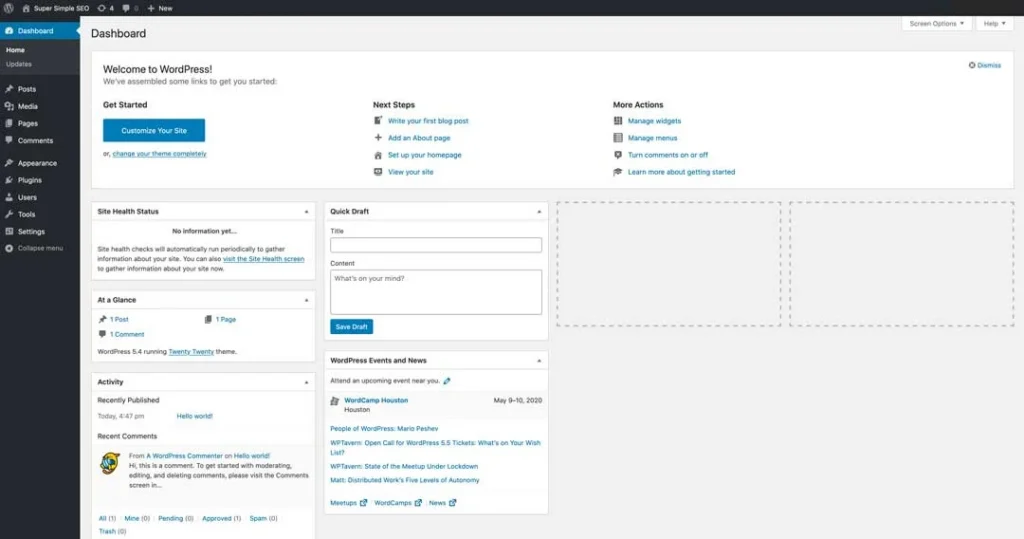
Step 1: Log in to your Wordpress Dashboard.
After you log in, you will see what is known as your “Dashboard.” There are tabs on the left that contain almost everything that you will use to create a positive SEO campaign.
For the purposes of this class, we will focus on just a few of the tabs. Your dashboard should look like the following image:
By now, you should have purchased a Divi license and downloaded the zip file containing the theme
If you haven’t done so yet, we highly recommend you do so now before continuing.
The next few steps will show you how to upload the Divi zip file and what settings are needed.
How to Upload the Divi Visual Builder
This section will show you how to upload the Divi Visual Builder into your WordPress site and what steps are needed to create a basic website.
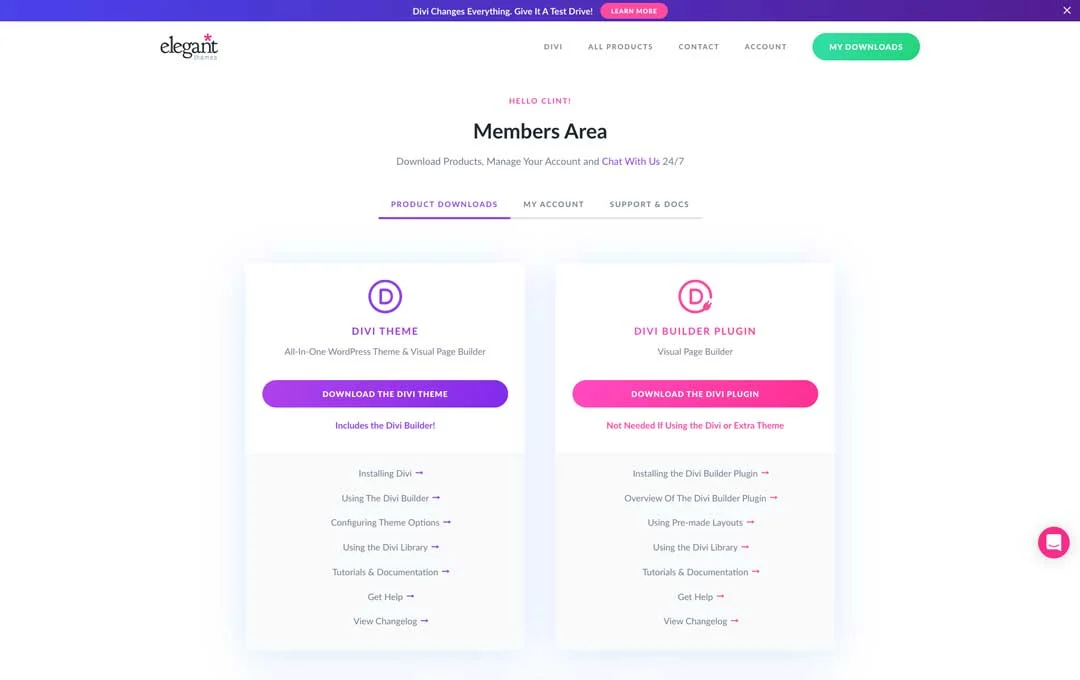
Step One: Log into your Elegant Themes account
Once you log in, go to the members area.
In the left column, you will see the “Download the Divi Theme” button. Click the button to download the theme zip file.
Once your Divi zip file has been downloaded, go back to your WordPress Dashboard and look for the “Appearance”tab on the left-hand side

In the “Themes” category, choose “Add New”
Choose “Upload Theme” in the same area on the next page.

Find the theme that you downloaded from Elegant Themes and select it in your file manager and click open (or OK). Your screen should look like this:

Click “Activate” to make the Divi theme your active Wordpress Theme.
Note: Typically this is where we would want to install a Child Theme. A child theme is an extension of the parent theme that can have its own functions, styles, and design that is completely independent of the parent theme. WordPress executes the child theme files first, so if you’ve customized your header, footer, sidebar, etc., those files execute instead of the parent theme.
A child theme requires the parent Divi theme in order to operate correctly. We suggest using a child theme (like one from Superfly – they’re the best!) so that any customizations you have made to the CSS and PHP don’t get lost in the event of a theme update.
For the purposes of this class, we will stick to just the stock Divi theme
Now that you have installed the Divi theme, it’s time to finish setting it up for maximum benefits.
In your WordPress Dashboard on the left-hand side, towards the bottom, you will now see a tab titled “Divi”. Go ahead and click on that tab.
Your next screen should look like this:

There are about a zillion settings and customizations that you can make here, but for this class, we will be focusing on specific ones for optimal results.
First, click on the updates tab.
In the Updates tab, you will need to enter your username for your Elegant Themes account.
Also, you will need to enter this installation API key.
To find your API key, navigate back to your Elegant Themes account and access the same Members Area (or you can hover over “Account” on the site menu, and from the dropdown select “Username and API Key”).
Scroll to the bottom of your API key list and click “Generate a New API Key.” Put some notes in the description field so that you can distinguish this API key from any others that you may have.
Your screen should look like the following (we’ve added the green rectangle to hide our API key). But it’s covering our key which is a long string of numbers and letters.
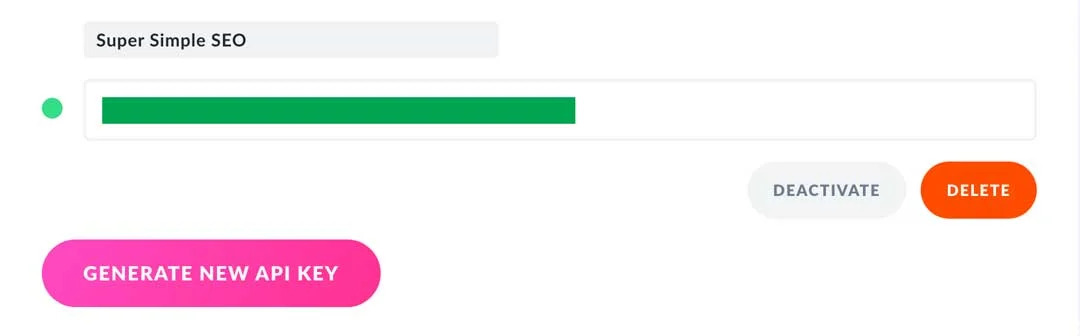
After you’ve added your username and API key, your website is connected to your Elegant Themes account and will receive updates and you will have access to the huge number of layouts (or templates) that Divi has which really help speed up your site creation process.
Create Some Pages Part 1
Although setting up your website is a huge step, don’t relax just yet. We have a long ways to go
Now we have to create some pages and fill them with our content
In this class, we are going to use some of those pre-built Layouts that we talked about earlier to help make this process easier and faster. The good news – they come with your Divi membership, so you have access to them as well
In your WordPress Dashboard, locate and click the “Pages” tab on the left-hand side.

By default, the Privacy Policy page and Sample Pages are uploaded for you.
You can delete the sample page but leave the Privacy Policy pages. While it may not directly affect your SEO score, it’s best practice to have one. Here’s a quick video from Yoast explaining privacy policy pages.
Ok back to our site.
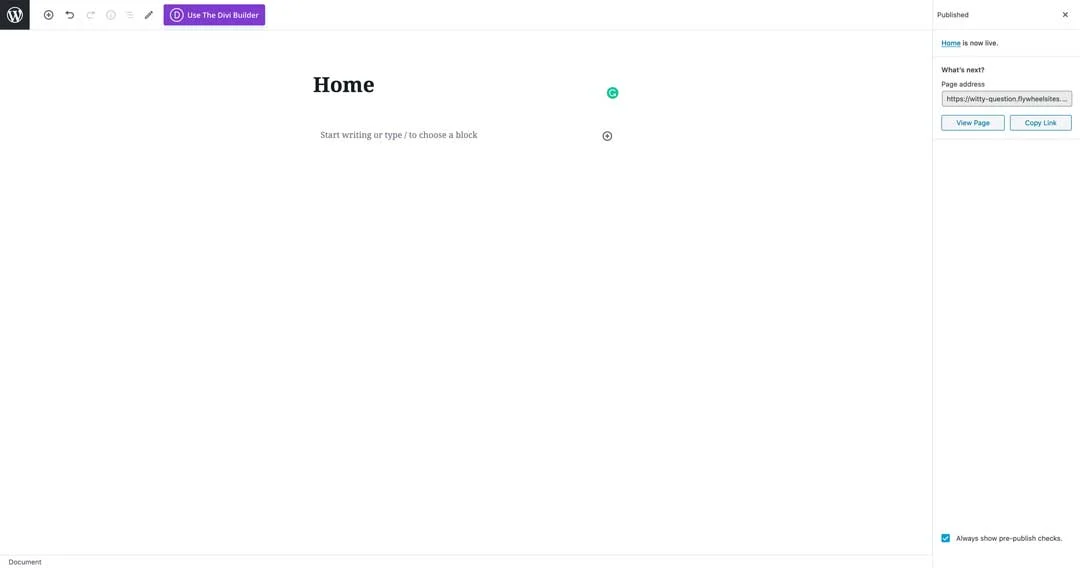
At the top of the page list is the “Add New” button. Go ahead and click on that. Your next screen should look like this:

If your screen looks a little different, don’t worry. Our site is using the newest Wordpress version 5.4 “Adderley,” which is a major release that was released on March 31st, 2020. For the purposes of this class, just make sure your screen is similar (although you always want to keep your themes and plugins up to date).
Give your page a title, in this case, we’re simply going to call our page “Home,” and go ahead and click publish a couple of times (we like to disable the “pre-publish checks notification”) to get our page created and “locked-in” to our site.
Congratulations you’ve created your first Wordpress page (and we haven’t even used the Divi visual builder yet!)
Create Some Pages Part 2
Ok, now let’s use Divi to create our page’s layout and get things looking all awesome.
Picking up from where we left off in part 1, click on the “Use the Divi Builder” button.
Your screen should look like the following:
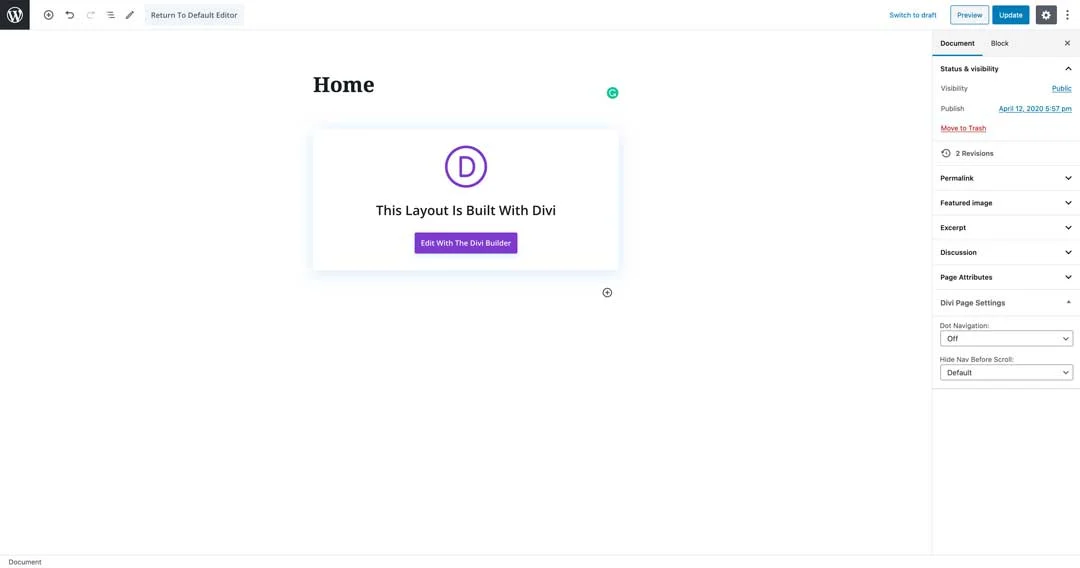
Because this is a brand new page, we have to click one more step before we’re wide open in Divi’s builder. Click “Edit with the Divi Builder.”
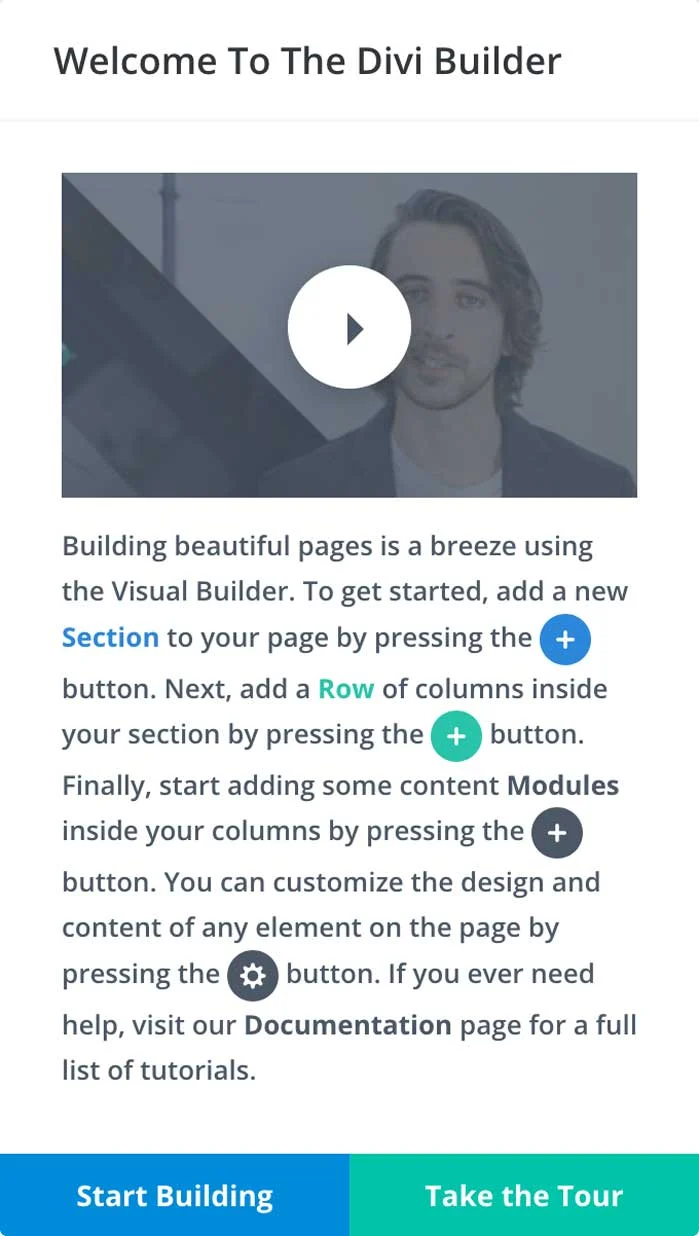
You’ll be greeted by a welcome popup featuring our friend Nick Roach, the owner and founder of Elegant Themes.
Let’s just click “Start Building” to close it.
Next, you will be faced with three options that you can use for creating your page.
Although each of these is super helpful in its own right, we’re going to use a pre-built template by clicking on “Choose a Premade Layout.”
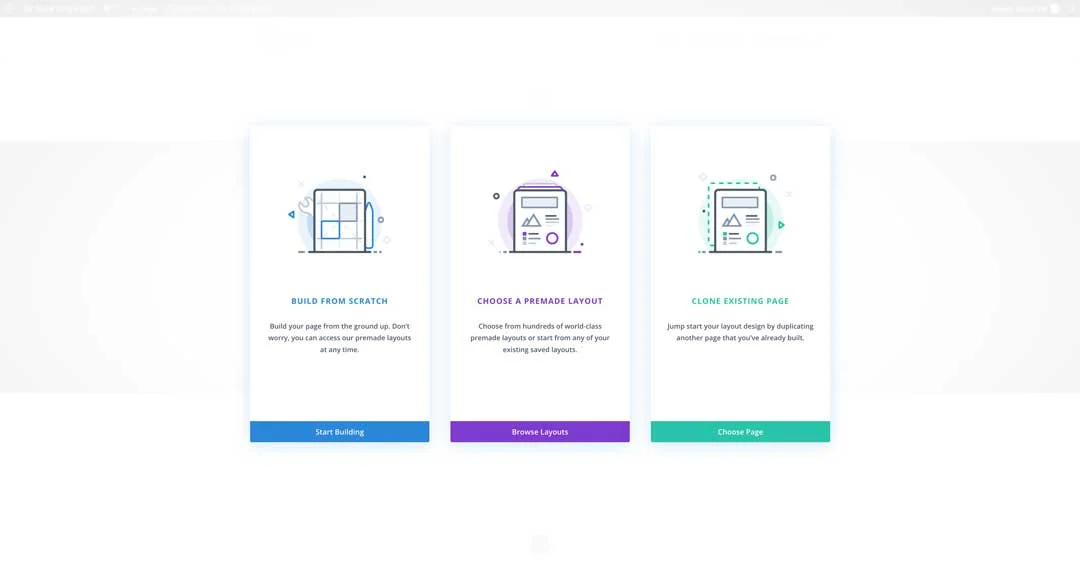
Divi ships with thousands of premade layouts (templates) that you can use either completely, or just use as starting points for completely custom designs.
Also, Divi has a pretty awesome fanbase and community that has free and premium child themes, layouts, and specialized plugins to help to make Wordpress sites with Divi that much easier.
Create Some Pages Part 3
Now, Let’s go ahead and click the “Agency” Layout Pack on the main screen.
The next screen shows you all the pre-built page templates for that particular layout pack that you can modify to best suit your business.
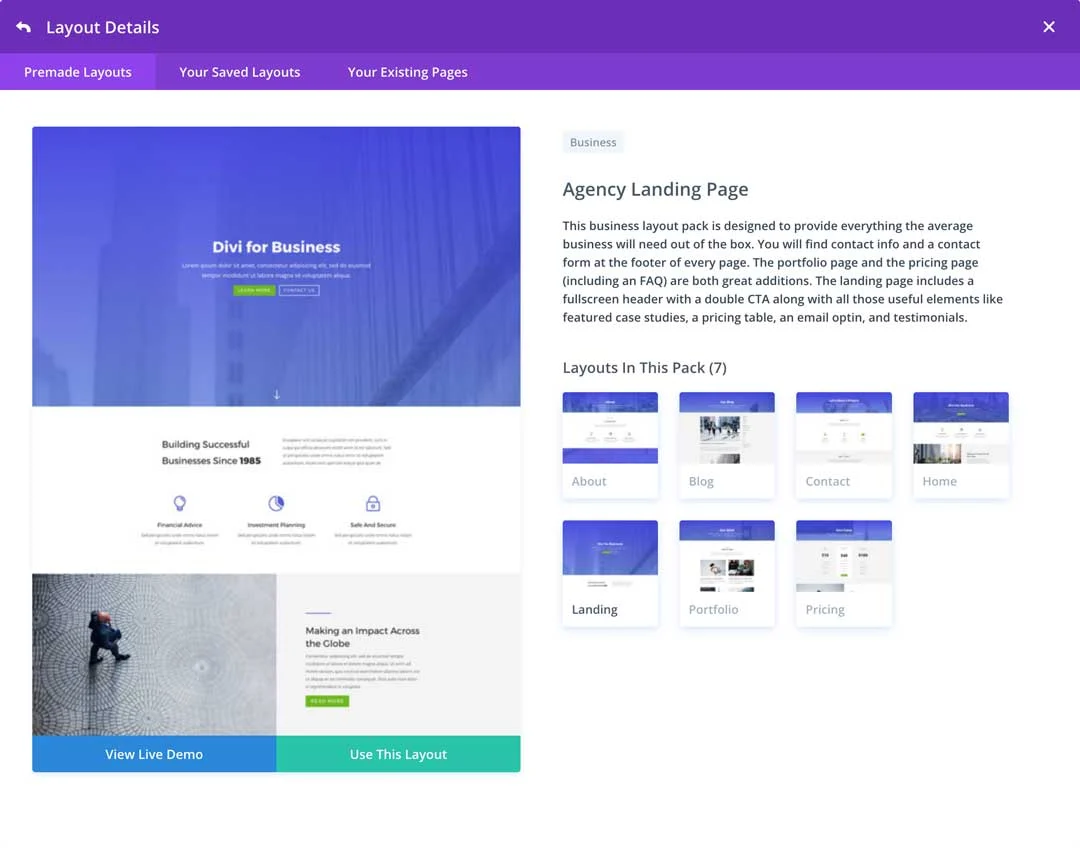
For now, we’re going to choose the “Home” layout and click on “Use This Layout”.
Congratulations! Once it’s imported and loaded, you’ve created your first fully functional and awesome looking page with the Divi Builder.
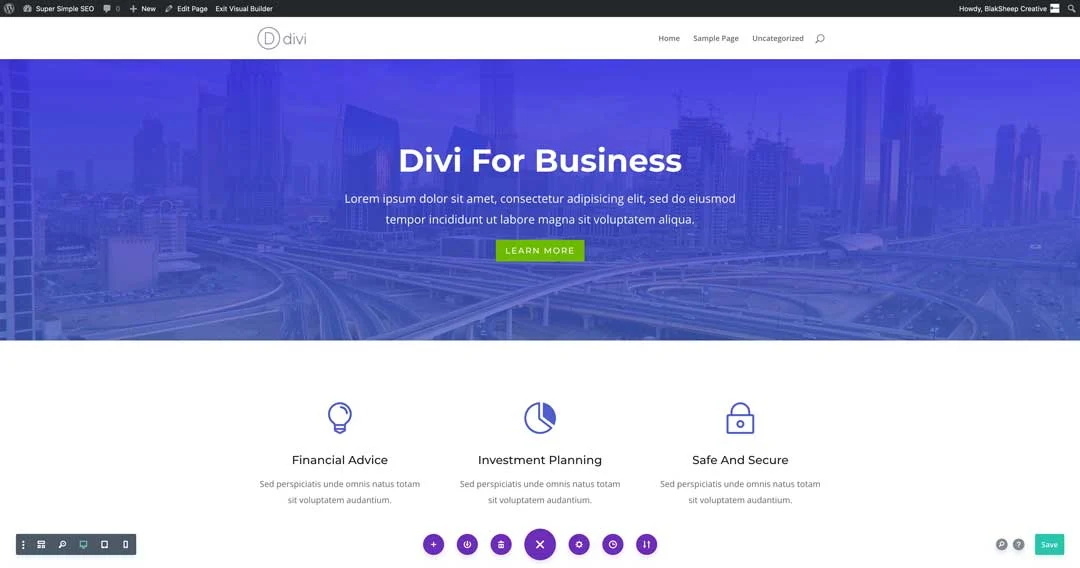
What’s so awesome about Divi, is you’re looking at the front end while working on the back end. In other words, you can see changes to your page live as you make them.
We know that the Divi builder can seem a bit intimidating, so if you get lost or confused, you can check Elegant Theme’s very own Divi Builder documentation and tutorials.
Feel free to go ahead and customize the page to your heart’s content. There are a lot of tweaks and customizations you can make to dial in the webpage to exactly what you want. Don’t forget to hit “Save” when you’re done.
Always hit save.
Now, let’s go ahead and continue to the next stages of WordPress SEO, combined with Divi.
SEO for pages best practices refresher:
- Each page of your website must have content that is 300 words in length or more.
- Ideally, each page should be anywhere between 1,000 to 1,500 words long.
- There should only be one H1 tag per page.
- Each section with a header should not exceed 300 words in length.
- Make sure to include that page’s main keyword in the H1 and H2 tag while synonyms of your target keyword should be in the H3 tags and paragraph content, respectively.
Let’s use one of our recent blog posts as an example since the same principles apply to blog posts as they do to standard web pages.
Our example post: https://blaksheepcreative.com/digital-marketing/social-media/3-covid-19-social-media-marketing-strategies/ (opens in a new tab for you to follow along)
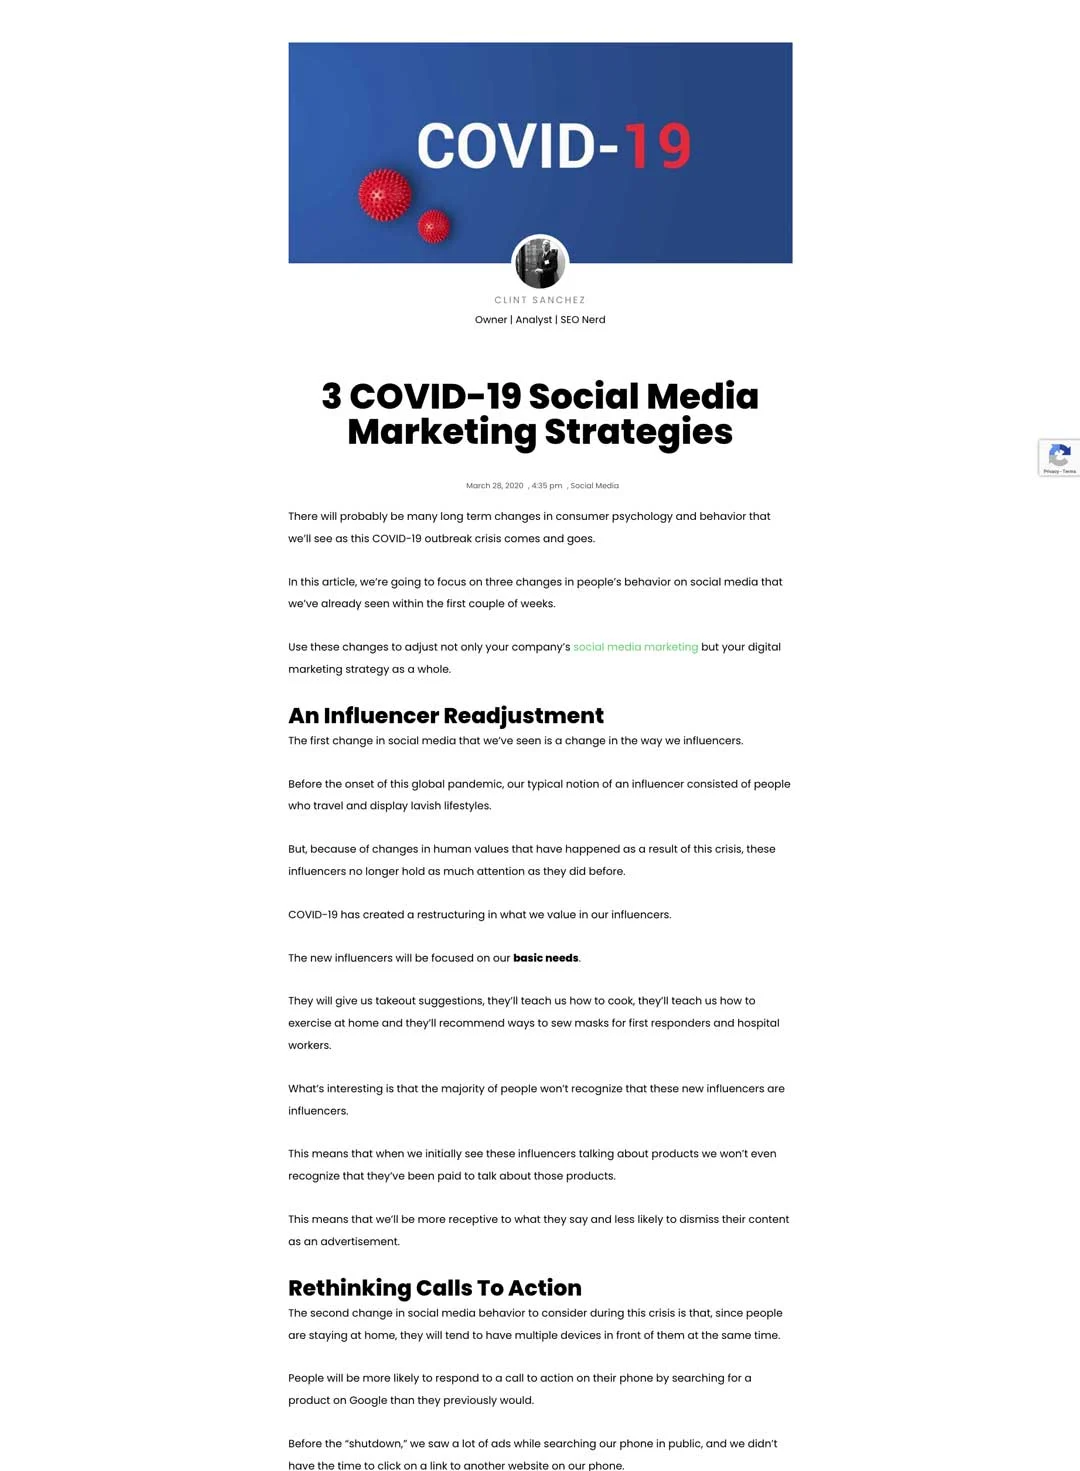
You can view the actual post by clicking on the link above, or just follow along with the image provided here.
Our focus keyword(s) here is COVID-19 Social Media Marketing Strategies.
In this blog post, “An Influencer Readjustment” is an H2 Tag whereas the title of this post is called “COVID-19 Social Media Marketing Strategies” and is an H1 Tag.
These two tags are the most important tags as these tags tell Google and other search engines what the post is all about.
In the next chapter, we will show you how to create the perfect content for your website’s pages using the Yoast SEO plugin.
Chapter 4 – WordPress SEO for Small Businesses
Finally, it’s showtime. It’s time for you to learn how to do Wordpress SEO (Search Engine Optimization.)
This guide is not meant to be the end-all-be-all of SEO guides for Small Businesses, but simply an overview that’s powerful enough to get you started on your way.
Recommended SEO Plugins
For a SEO campaign to be successful, you have to be using the right SEO tools.
WordrdPress Plugins are simply that – tools!
Yoast SEO – Yoast SEO is probably the most important tool you will want to download and use for optimizing your website.
Be watching our blog for an upcoming Yoast SEO plugin guide, but for now we’ll teach you all you know about it to get started.
MonsterInsights – While we’re purists and prefer to use Google Analytics directly from Google’s page for it, those who aren’t SEO professionals can use MonsterInsights. This plugin makes it “effortless” to properly connect your WordPress site with Google Analytics, so you can start making data-driven decisions to grow your business without any special knowledge.
Monsterinsights can help you:
- get the stats that matter right there inside your WordPress admin
- see useful information about your site’s visitors inside your WordPress dashboard
MonsterInsights shows you important data such as
- which country your visitors are from
- what are they most interested in
- which device are they using
- their age
- their gender
Schema – Schema markup is code (semantic vocabulary) that you put on your website to help the search engines return more informative results for users.

Properly adding Schema JSON-LD to your site increases your chances of landing the sought after rich snippets in search engine results pages. Now, that’s a topic we’ll have to discuss in another article, however here’s an example of a rich snippet created from Schema implementation.
Monarch Social Sharing- Elegant Theme’s Monarch Social Sharing Plugin allows your website’s users to share the content over 20 different social media platforms by adding share buttons in any number of configurations.

Search engines notice when people share your pages, and this creates what’s called “Social Signals,” and adds relevance to your content.
These are our four favorite plugins to use for all of our clients, including our own website.
We will be releasing a definitive guide for MonsterInsights, Schema, and Monarch as well in the near future so be sure to keep an eye out on our blog.
How to use the Yoast SEO Plugin
If you need help with your website’s SEO and need a simple and easy-to-use plugin, Yoast is your guy!
Yoast SEO is the original (and most popular) WordPress SEO plugin since 2008. It is the favorite tool of millions of users, ranging from the small mom and pop businesses to some of the most popular sites on the planet.
With Yoast SEO, you get an effective toolset that helps you aim for that elusive number one spot in the search results.
Yoast SEO does everything you can imagine to please both visitors and search engine spiders.
You can use it to take complete control of your WordPress SEO and it also offers;
- Advanced XML Sitemaps functionality at the push of a button.
- Full control over your sites breadcrumbs: add a piece of code and you’re good to go.
- Creation of canonical URLs to avoid duplicate content. You will never have to worry about Google penalties again.
- Title and meta description templates that you can use for better branding and consistent snippets in the search results.
- With the premium version, you can expand Yoast SEO with the News SEO, Video SEO, Local SEO, and WooCommerce SEO extensions.
- Yoast SEO Premium users get 1-year free access to our awesome support team.
Write Optimized Content with Yoast SEO
- Yoast’s Content & SEO analysis are Invaluable tools for writing SEO-friendly texts.
- The snippet preview shows you how your post or page will look in the search results – even on mobile. (Yoast SEO Premium even has social media previews!)
- In the premium version, the Insights tool shows you what your text focuses on so you can keep your articles in line with your keywords.
- The premium version allows you to have multiple focus keywords so that you can optimize your article for synonyms and related keywords.
- Premium users get automatic internal linking suggestions to get suggestions for internal linking within your website.
Keep Your Website Optimized
- Yoast SEO tunes the engine of your site so you can work on creating great content.
- Yoast’s cornerstone content and internal linking features help you easily optimize your site structure.
- The plugin Integrates with Google Search Console so that you can see how your site performs in the search engines and fix crawl errors.
- You can create and manage SEO roles to give your colleagues access to specific sections of the plugin.
- Yoast’s bulk editor helps you make large-scale edits to your site.
- Premium users have the ability to view social previews and manage the way their page is shared on social networks like Facebook and Twitter.
- Premium users also have access to a redirect manager that can be used for keeping their site healthy by easily redirecting errors from Google Search Console, deleted pages and changed URLs. What’s awesome with this feature is the plugin detects when you make a permalink change and creates a 301 redirect automatically.
How to set up the Yoast Plugin
In your WordPress Dashboard, click the “Plugins” tab on the left-hand side.

On the next screen, choose “Add New” (just like when you used the “Add Page” function earlier).
By default, the “Akismet” and “Hello Dolly” plugins are installed but we always delete these two because we never use them, and the fewer plugins you have on your website the better.
After clicking “Add New”, you should see a “Search Plugins” field on the right-hand side. Type in “Yoast SEO” into that search bar and you’ll see a list of suggested plugins.
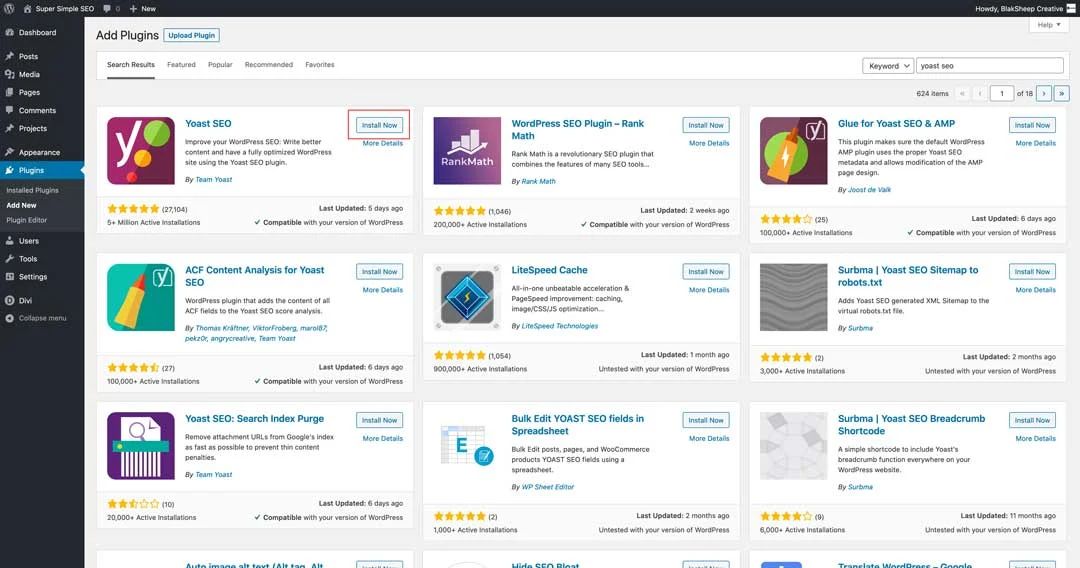
Click “Install Now” on the plugin (the area with the red box around it in the above image).
After clicking on “Install Now”, click the same button again when it says “Activate”. After activating the plugin, you will be redirected back to the Installed Plugins screen. Once the plugin has been activated, click the “Settings” option. Your next screen should look like this:
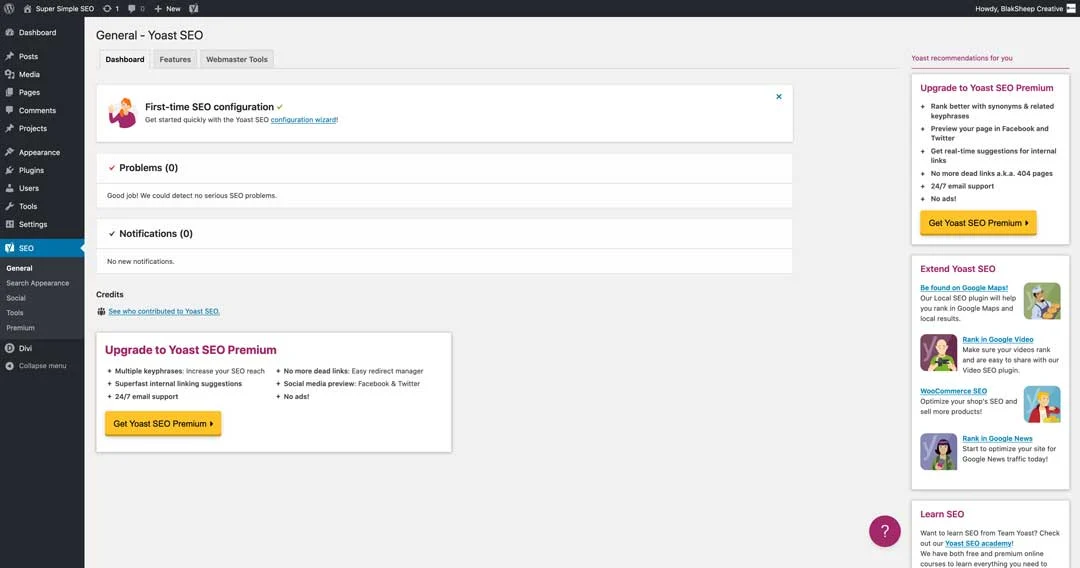
In the “First-time SEO configuration” box, choose the “configuration wizard” option. The configuration wizard should now start right up.
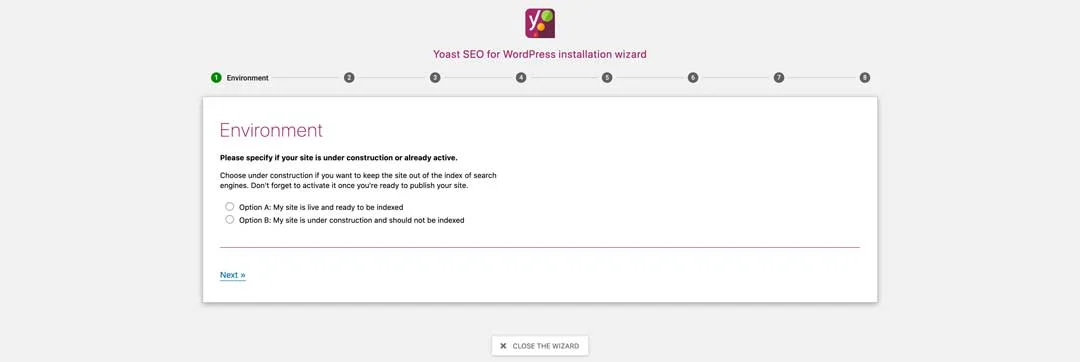
Environment: Select “Option B” because we’re just developing the site right now and click “next.”

Site Type: Choose “A small offline business” or whichever best suits your company type.

Organization or Person: Choose “Organization” and enter the name of the company. You can upload a company logo here or you can do it later – your choice. Also, fill in your company’s social media profiles here.
Remember when we talked about Schema earlier? Well Yoast SEO uses this information that you enter to add HTML markup to your pages. Read more about what markup the plugin adds.
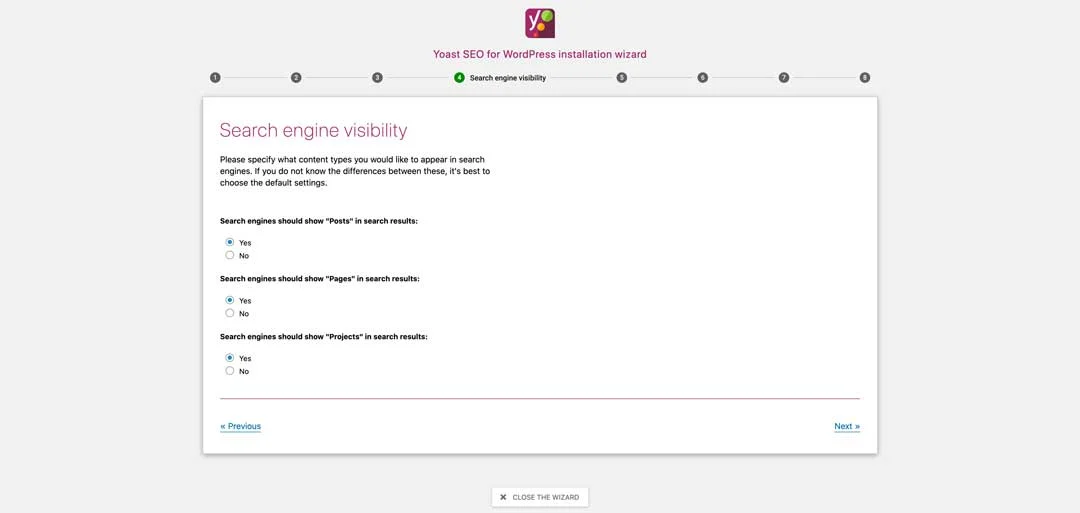
Search Engine Visibility: If your business has projects or anything that you’d like to showcase on your site, you can leave the Projects option enabled. Projects is actually a Custom Post Type (CPT) that is auto-generated by Divi and is hard to remove without using custom code. If you’re not using the projects option, you can go ahead and change the option to “no.” now. You can always come back and re-enable it if you need to.

Multiple Authors: You can just leave it as default “No” for now.

Title Settings: Fill out your site name here, and we always change the title separator to what we call the pipeline (the |), it just looks better.

Continue Learning: We are skipping this for now, but you can sign up for the newsletter and check out some of their tutorials if you want.
Success: We’re finished with the initial set up! Now click “Close the Wizard’ and you’ll be taken back to your Wordpress Dashboard at the SEO Plugin tab (Yoast is shown as SEO in the Wordpress backend).
How to set up Yoast’s additional features
Now let’s continue setting up your Yoast SEO plugin to make sure we take advantage of all of the features that it has to offer.
Next to the dashboard tab is “Features”. You can enable or disable most of the features from this list. If you’re unsure as to what a feature does, you can click the question mark next to it. For now, let’s just leave them all on.

In this tutorial, we’re not going to use the Webmaster Tools offered by the Yoast plugin. Instead, we are going to have Divi insert the code for us. This method is more reliable and won’t let you down (unless you change themes away from the Divi theme).
First, you’ll need to set up your Google Analytics account.
How to set up your Google Analytics Account
Login to your Google Analytics account using your Gmail address. (If you don’t have one, create one now.)
Make sure you’re in the admin tab and press “create account.”

Next, give your account a name and then press next.
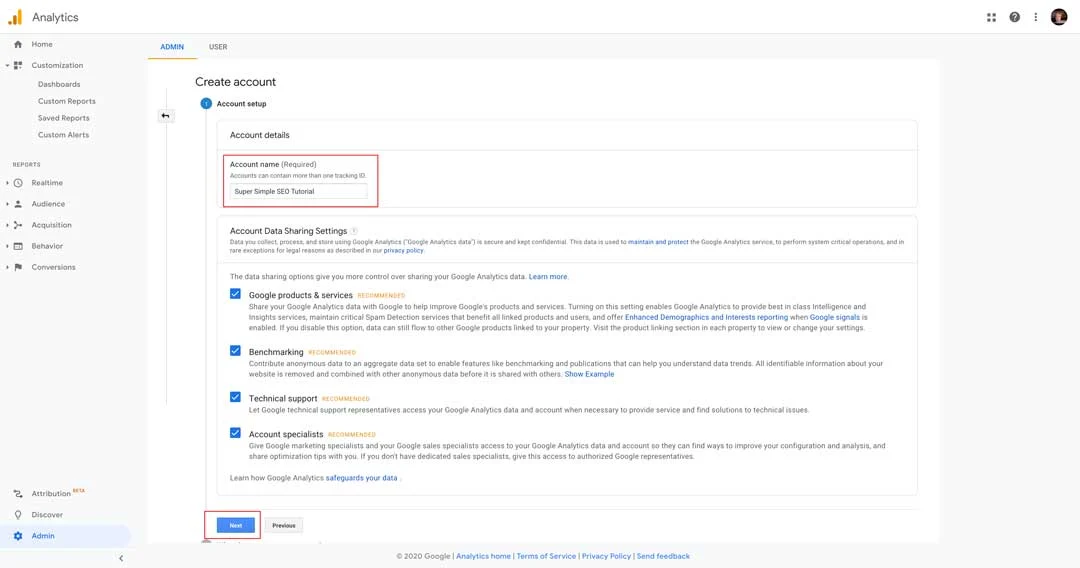
Select web to let Google Analytics know that you intend on measuring your website’s data.

Next, complete the forms we’ve highlighted in red: Give your site a title that you can remember (we used our site title, go figure).
Put in your site’s URL (hopefully, the site you’ve set up has SSL enabled and has the https:// NOT https://) Websites in 2020 have to be secure for SEO.
Put in your industry and time zone. (We put other just for this development website, and put Chicago for our time zone because we’re based in Louisiana. You just put what is applicable for your business).

Next, you’ll be greeted by a popup with Google Analytics’ terms of service. Check the two buttons acknowledging their terms and then click create.

Now let’s grab that tracking code from the next page. We’re going to enter that into Divi’s integrations, and not use Yoast for this just because it’s better as long as you don’t change your theme from Divi. Don’t worry about the green blocks, that’s where we have redacted our information from spying eyes.
Highlight the code outlined in red here, and press CTRL-C (or CMD-C if you’re on a Mac) and go back to your Wordpress Dashboard.
Click on Divi on the left, and then Theme Options. On the main screen, you’ll want to click integrations.
Now that you’re in the Divi integrations tab, press CTRL-V (or CMD-V on a Mac) to paste the code that you copied from Google Analytics previously. Make sure your screen looks something like this (you’ll have numbers where the black boxes are).
Make sure to click “Save Changes” on the bottom of the page. Now we don’t have to worry about setting anything else up for Yoast. But, of course, you can go through it in more detail and tweak the settings to best suit your website.
WordPress SEO for Small Businesses with Yoast
Now it’s time to really get busy doing some optimizing. After your plugins have been set up, head on over to the Pages tab and click. Now hover your mouse pointer over the “Home” page link and you’ll see a few options appear: Edit, Quick Edit, Trash, and View.
For this example, we are just going to add more “Lorem Ipsum” text, or more commonly referred to as “dummy text” on the front end of the website.
Here’s how the Yoast SEO plugin looks on the “backend” (you can follow along by clicking on “edit” on your site. Note this opens Wordpress’s backend editor, this is NOT the Divi Builder)
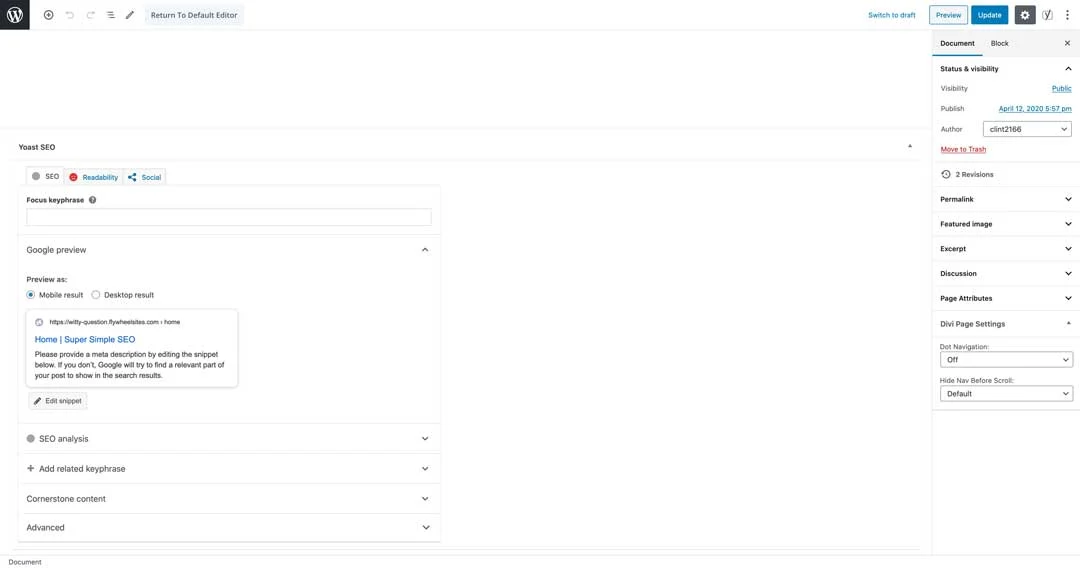
Quite a few of Yoast’s features are folded up in their menus but don’t worry, we will go through them one at a time and unfold the menus as necessary.
Yoast Metadata
The Metadata fields give you a peek of how your page will look in the search results. If done properly, changing the SEO title, slug, and meta description will greatly benefit your SEO efforts. Below is an example of how the fields should be filled out:
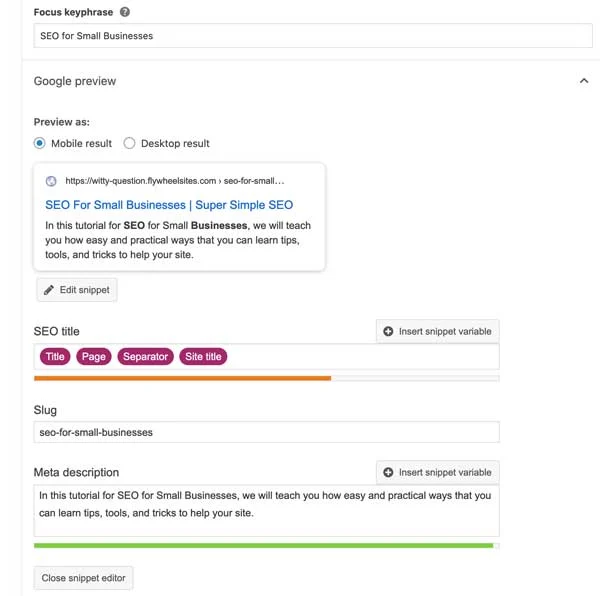
The “slug” is the URL extension containing the desired keyword for that page.
For example, if you are wanting to rank our page above for “SEO For Small Businesses,” we would write a slug reflecting your SEO services i.e. “url.com/seo-for-small-businesses/” would be entered into the slug as “seo-for-small-businesses”.
Keep in mind: the slug should match the focus keyword if at all possible
Now let’s look a little deeper about how to use Yoast on the rest of a page.
Yoast Page Analysis
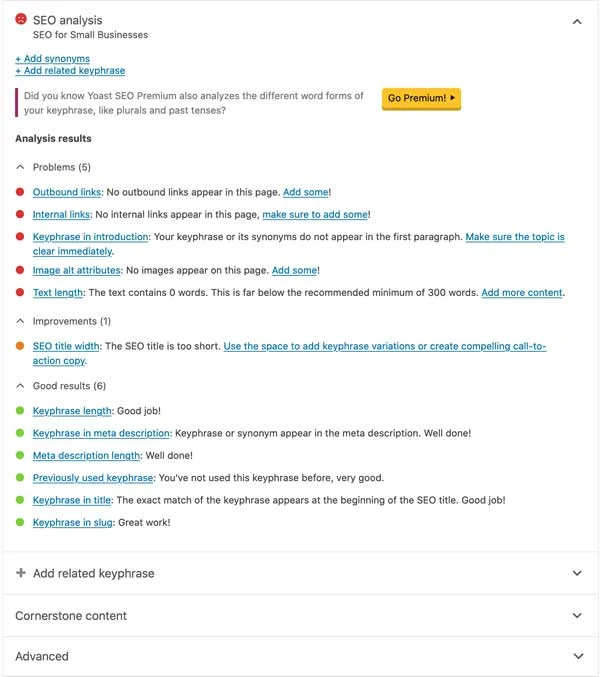
Now let’s take a look at the Yoast Analysis from our SEO for Small Businesses. Each link in each suggestion is a link to a specific suggestion page on the Yoast website. If you get stuck or need more information on them, click on them and read them.
Now let’s take a look at the Yoast Analysis from our SEO for Small Businesses Each link in each suggestion is a link to a specific suggestion page on the Yoast website. If you get stuck or need more information on them, click on them and read them.
Overview of Yoast’s Analysis
Let’s flip over to one of our posts on the BlakSheep Creative website. You can view the post at https://blaksheepcreative.com/digital-marketing/marketing-strategy-vs-marketing-plan-similarities-and-differences/ (although an internal link, this one will open in a new tab so that you can follow along if you want to.)
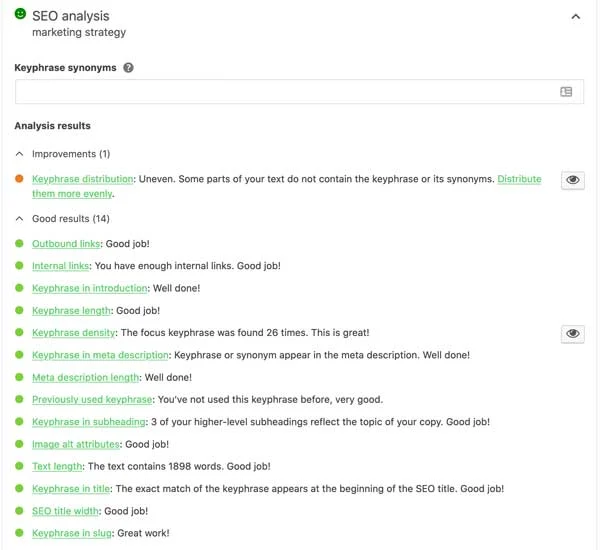
Let’s look at Yoast’s analysis on the backend, and how it is “greenlit” with those awesome happy faces.
Not bad, huh? Scroll to the next page to learn how we were able to get these results.
Now let’s go into more depth about each section.
Outbound Links: Our post had external links (make sure to set them to open in a new tab so that users can always come back to your page quickly) that led to relevant sites.
Internal Links: The post has links to other pages/posts on our site that users may find relevant and useful.
Keyphrase in introduction: If at all possible, you want to use your focus keyphrase in the very first sentence to make the page’s topic clear. If you can’t, just get it there as soon as possible.
Keyphrase Length: The optimum length for a keyphrase is up to 4 content words.
Previously Used Keyphrase: Always use a specific keyword for a specific page. Never, use the same keyword for another page. This is called “keyword cannibalization” and you’d have two pages competing against each other (among other things).
Keyword Density: There is no exact number for keyword density but a good rule of thumb is to keep it between 1-3%. Never use the old tactic of “keyword stuffing” – the tactic of sticking your keyword all over the place in excess.
Keyphrase in Meta Description: The keyphrase needs to be included in the meta description and must read naturally.
Meta Description Length: Meta Description length must be in the “green” (although Meta descriptions can be any length, Google generally truncates snippets to ~155–160 characters. It’s best to keep meta descriptions long enough that they’re sufficiently descriptive, so we recommend descriptions between 50–160 characters.
Keyphrase in Subheading: You’ll want your keyword(s) to appears once in a subheading i.e. H2 or H3 tag.
Image Alt Attributes: Make sure to include alternative text in all of your images for the benefit of search engines, users, and those using assistive readers.
Text Length: Each page or post should be 300 words or more in order to prevent the search engines deeming it as “thin content”. However, if your content is high-quality and valuable both to the reader, it’s possible that 300 words or less can rank well.
Keyphrase in Title: Make sure to include your keyphrase in the title of the page or post.
SEO Title Width: Your SEO title is the first thing that users will see in search results. Make optimum use of the space. If your SEO title is too long search engines won’t be able to show the entire title. Always have the focus keyword in the title of the page.
Keyphrase in Slug: The slug is the part in a URL after the domain name. Your article or page should live on an easy to remember, focused and SEO-friendly URL.
Chapter 5 – Internal Linking vs Outbound Linking
In this chapter, we will discuss the differences between inbound and outbound links, and their importance to your website’s SEO.
Basically, internal links are links embedded on one of your pages that link to another page on your site. Outbound links (external links) are links embedded on one of your pages that link to a different website.
Internal and Outbound (external) links are one of the easiest and simplest parts of an SEO strategy. This practice is commonly referred to as “link building.”
Benefits of Internal Links
Internal links on a web page will help keep your website’s visitors stay engaged with your website longer. This may encourage them to become a customer or follower. These links are more accessible to your visitors, and they increase Google’s perception of your webpages and site’s authority.
Internal links are often used as a call-to-action. For example, they might prompt a viewer to read or learn more about a topic by clicking on the internal link, or could ask a viewer to contact you or schedule a visit.
Your website’s visibility and rank on a search engine can be improved by adding internal links. The anchor text — the text of the hyperlink — should be a specific and descriptive group of keywords that will help a search engine bot to better “crawl,” or understand, your web page.
Internal links will help a bot find other web pages on your site, too. A web page that is easy for users and search engine bots to navigate will properly index and the web page will be added to a search engine’s web pages so that your site can be found.
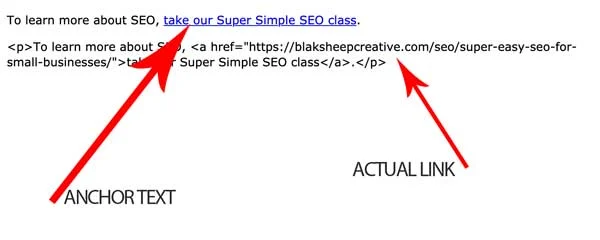
Look at this image for an example.
The HTML code is there just for reference, but you can look at it to see where the internal link is pointing to.

While we’re on the topic of links, let’s discuss a no-no that we see all of the time. You probably see links like “click here” or “here” all of the time. Please never, ever, ever, do it.
- You’re missing the opportunity to give search engines more opportunity to see what your page is about (thereby missing out on some SEO love).
- Using vague text offers no value to the user, especially those using assistive technologies.
Don’t do like in the image above, Instead, go ahead and make your anchor text descriptive.
Benefits of External Links
The quality and quantity of the external links that you use matters to search engines. By adding trustworthy and informative website links of high quality to your pages you’ll improve the credibility of your website. Adding poor-quality and spammy links will hurt your site.

Linking to outside websites will not hurt you as long as the page that you’re linking to is authoritative.
An external link is more valuable if it links to popular and relevant pages that are highly ranked and related to the content on your web page.
Valuable external links will also help to improve the authority of your website, by providing a viewer with references.
Some SEO professionals say that a good rule of thumb for your link building efforts is to have 3 internal links and 3 external links per page. But, in our opinion, you just want to create links where they’re applicable. Don’t force it.
When Google crawls these pages periodically, the links help them know where they need to know where to go next.
As long as your links send them to content that is both relevant and of high-quality, the more “link juice” you’ll receive as a result.
Ultimately, search engines, over time, begin to recognize your website as a whole as an “authority” for whatever the website topic may be about and could begin ranking your website higher.
This increases your domain authority (DA). Now we could go on about whether DA is just a vanity metric or whether Google actually weighs it in their algorithm, but that’s beyond the scope of this article.
Just know that If the content you’re looking to is not relevant or high-quality then search engines will begin devaluing that page and inevitably your entire domain.
Now, there’s a lot more we can discuss about internal and external links and how linking strategies should play into your SEO campaign, but that’s beyond the scope of this tutorial.
Next, we will discuss Heading Tags and why they’re critical for successful SEO (and user experience)
Chapter 6 – The Importance of Heading Tags for SEO
Having proper heading tags is important for SEO, user experience, and web accessibility . Here are some reasons why it is important to have proper heading tags on your website’s pages and posts.

Headers Make Webpages Scannable
Most people rarely read articles in their entirety online. They scan them. The only time they read every word of an article is when they are highly interested in the topic.
Headers make it easier for people to scan the page. They typically start with the first header and if it interests them, they will move on to a subheading.
The subheading usually gives them one piece of the information they are looking for, and then the following subheading gives them another piece of information. If they want more details, then they will read what is in between those subheadings.
By using headers that accurately reflect what the content is in your article, you will make sure that people actually read your content.
Content Marketing is an important facet of digital marketing and takes a bit of effort. By making sure your headers and subheaders are engaging and accurate, you’ll see more of a return on your effort by attracting and keeping people who are likely interested in what you have to offer.
Headers Help Your SEO
Headers are also an important part of on-page SEO. Search engines, such as Google, love headers for the same reason that people do — headers make reading (and analyzing) content easy and quick.
For search engines, crawling the internet is resource intensive and costly. Best estimates place Google at having over 900,000 servers. When a search engine bot can crawl a website page by going from one heading to the next, it can grasp the gist of the information more efficiently and it can know which online searches to rank your pages in.
Always, make it as easy as you can for the bots.
When creating your headers, think about the keywords you want your page to rank for. Your headers should provide a general overview of the content on your page or in your blog post, and you want that content to be relevant to the searches you’d like to rank for in Google.
If you can’t naturally use these keywords in your headers, then you may want to rethink the copy on the rest of your page.
How to Properly Write your Headers.
You want to write headings that are informative to the person reading your page. Your primary focus on headings should be on your content and should read naturally when using your focus keyword or phrase.
Plus, if readers are using headings to better understand what the page or article is about, so will Google and other search engines as well.
Always keep the bots happy.
If you remember from a few chapters ago, your H1 tag should always be the title of the page or the blog post, and your page or article should have only (and exactly) one H1.
H2 tags should also only be used once also if it is not being used properly later on in the page and/or article.
Here’s an example on how to use properly use headings on your site:
H1: Webpage Headings are important
H2: Why headings are important
H3: Headings help readers
H3: Headings help search engines
H3: Headings help visually impaired readers
H2: Where do you put headings on a page
H3: Page title
H3: Page subheadings
H2: Recap
Should you need to drill down your content and go into more depth, you can also use H4 and H5 tags as long as you use them in numerical order. For example, H4 before H5 and H5 before H6, etc…
So How Should Headings Look On A Divi Website?

Take a look at the images below on how to make sure they follow the proper heading structures.
Let’s go back to the home page we created earlier as an example. Go to the page tab, hover over the area for the individual part and then click “Edit in Divi” and hover your mouse over a specific heading section to view the available options:

Now, click the Gear Icon in the Dark Gray box to open up the “Module Settings”. A pop up should appear:
You’ll see the text that says “Divi For Business.” That’s the text that was automatically inserted when we loaded the Agency Home page template.
Let’s change that to reflect the heading structure that we used above.
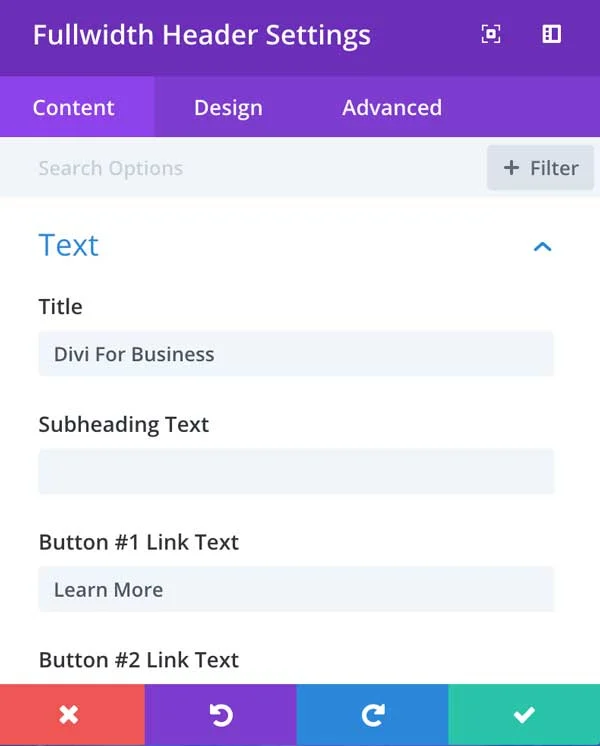
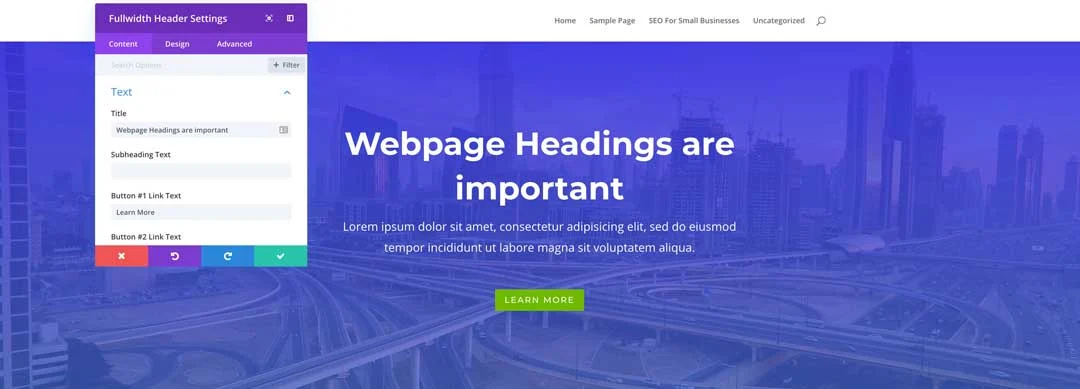
Click in the title field and replace the text with our H1 from earlier, “Webpage Headings are important” Note you’ll see the changes made live. That’s the beauty of Divi!
Now, click on the “Design” tab, and scroll down to the “Title Text” section. Open the “Title Text” section.
If the Heading Level number is blue, that notes what type of heading it is. In this case, it’s an H1.
Now, you can keep going through the page, making your headings the appropriate type and text. Bear in mind that each module in Divi is different, but just play around and don’t be scared to experiment. That’s how you learn! When in doubt refer to Elegant Themes tutorials.

Chapter 7 – Divi, WordPress, and Image SEO
The next important thing in your website’s SEO is, properly optimizing your images, also known as Image Search Engine Optimization (Image SEO). Whether used or not, each image on your website must have the proper structure and information in place for optimal results.
Anytime you create a page, there should either be an image included on the page or at the minimum, the page should have a featured image.
All of your images should also load quickly or otherwise search engines will reduce the value of not only the image but the entire page as a whole. We will get into page speed and properly sizing/compressing your images in a bit.
By having an image on your page, blog post, article, or whatever it is, you stand a higher chance of the user being more engaged with your content and are more likely to share your content.
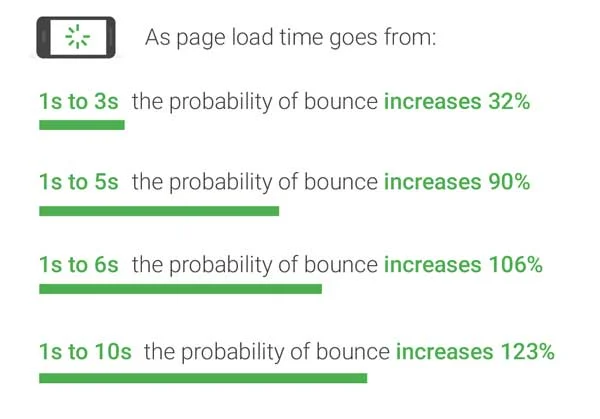
But you’ve to keep them around to get them engaged. If your website loads slowly, they’re more likely to “bounce” to another page. Look at these statistics about bounce rates and speed:
How to do Image SEO
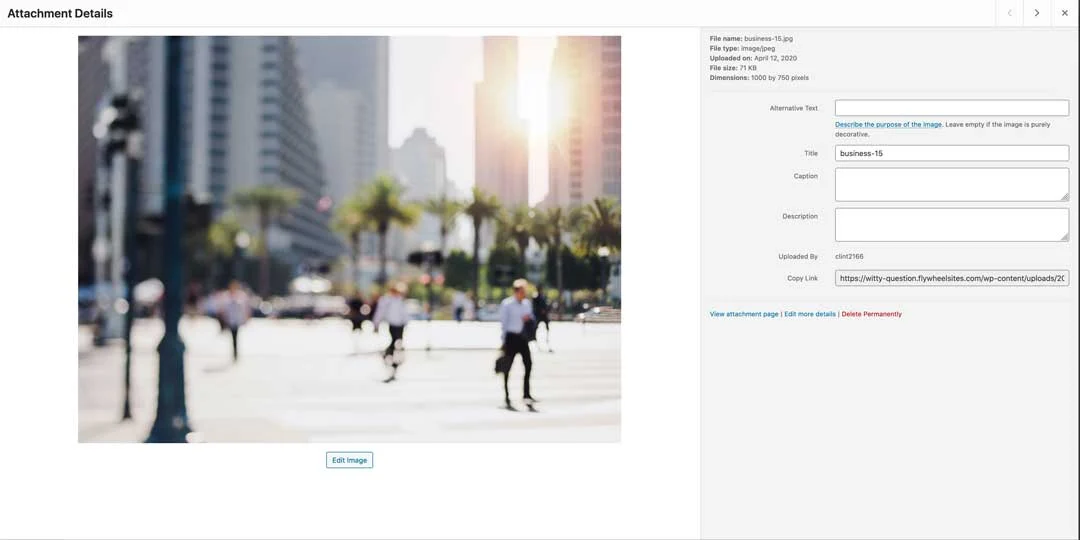
Performing proper Image SEO is actually pretty simple. When you upload an image to the Wordpress media library, you’ll see a box like shown below:
First, we’ll show you how to properly complete these fields, and then we will show you some ways that you can optimize your images in Divi.
Alternative Text
If you remember from our previous lessons, Alternative Text (or Alt Text) is what screen readers use to tell visually impaired users what the image is. The Alt Text is also used in all instances where the user is using some sort of assistive technology.
You want to make sure that all of the images on your site have Alternative Text included to make sure that all users have the same access to your website’s information and images.
Be sure to write descriptive Alt Text and don’t just use one or two words. Try to include your keyword or keywords if at all possible (and natural).
Title
When you upload an image, Wordpress will automatically generate a title for you, based off of the file name. That’s why you should get into the habit of giving your image files real names. You will benefit none from SEO with an image titled “DSC_0001.jpg.”
Plus it helps you search and find images in your media library. And, it just makes sense. Nothing is more aggravating and painstaking then when a client sends us a folder full of images with number file names. Of course, we go in and try to give them descriptive names, but it takes a while.
Caption
Captions allow you to provide additional details for an image to all your users. They are visible on the screen for all users including search engines and screen readers. Just know that captions are optional and are typically used for:
- Family or event photos
- Photos that need additional explanation describing the background story
- Product image galleries
Description
This is another optional field. If you add text to the description field that text will be stored as post content for the attachment post. That means if someone lands on the attachment post page for the image they will see the long description (provided the current theme supports it).
There’s much debate about whether to use attachment pages or not, and we scarcely use them. As a matter of fact, Yoast has an option to redirect those pages to the actual post. Learn how to set up Yoast to redirect attachment pages over at WP-Explorer
Learn more image SEO tips and tricks over at Search Engine Journal.
Make sure your images are the right size.
We will show you how to make sure that images served on your website are the right size in another article. Just know that you want to use image sizes that are the right size for their use, and no larger. Far too often we see clients’ websites that have images that are way too large for their use, which slows websites down.
Search Engines hate slow webpages.
How to Do Image SEO in Divi Builder
Let’s go back to the page we created earlier in Divi.
Click the gear icon in the Module settings for the image added. We’ve deleted all of the sections below our hero header (the top section), added a new regular section with a two-column row, and added an image module on the left column.
Note that Divi automatically inserts a placeholder image, which we’ll just work with for now.
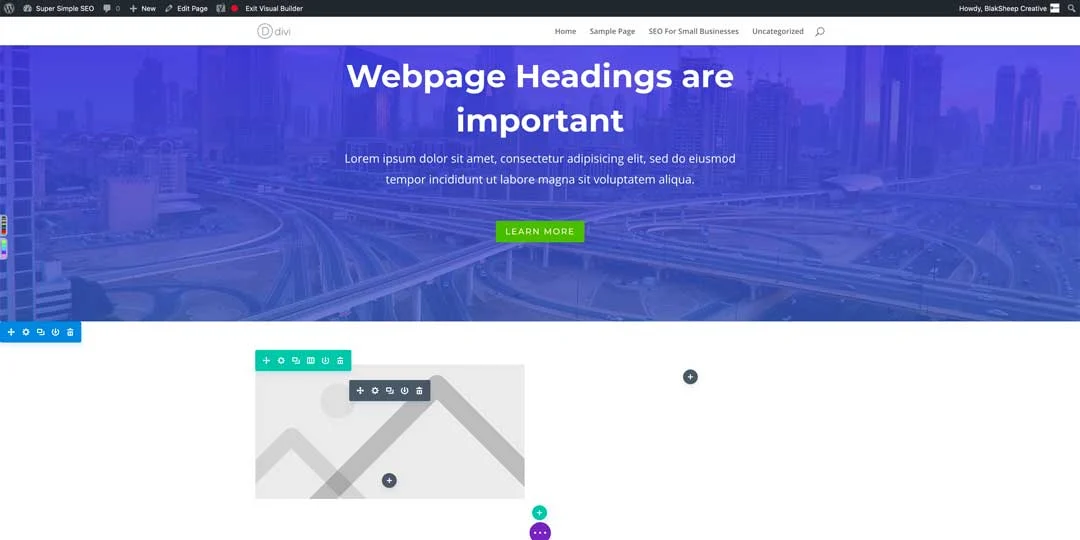
Now click on the gear icon for the image module (Sections are blue, rows are green, and modules are grey).
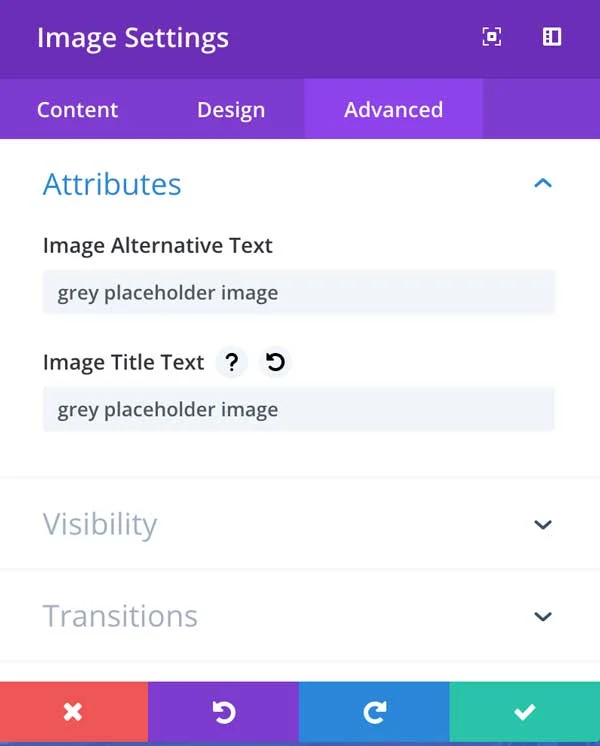
A pop up will appear for the “Image Settings”. Click the “Advanced” tab and then the “Attributes” tab.
Here you can add the same information from before.
Unlike other builders, with Divi, anytime an image is added from the visual builder, the image alternative text and image title text must always be filled out with the proper information.
Remember this. It took us a while to get in the habit of adding this information “manually.”
Once those two fields are filled out, click the green checkmark and then click Save. Congratulations, you’ve now properly optimized your first images for SEO using Divi and Wordpress.
Chapter 8 – How to Do Keyword Research & Analysis
Congratulations! You’ve made it to the second to last chapter in our super simple SEO guide for small business owners.
Hopefully, now you’ve come to realize that SEO is a rather involved task. Unfortunately, search engine optimization involves a whole lot more than we can fit into this one lesson. But, we hope we’ve managed to give you a solid foundation to work with.
To make matters worse, SEO changes all the time. Like a lot. It’s crazy involved, but it doesn’t have to be difficult.
There’s a reason why we have kept out a lot of key terms and concepts because you’re probably just starting out, and don’t necessarily need to know them. Over the next two chapters, we’re going to break down how to do keyword research and show you some tips and tricks to use.
Lastly, we will break down how to not only set up your Google My Business account but how to optimize it as well and what information should be included.
You’re in the home stretch, let’s do this!
Keyword Research and Analysis
There is an endless list of tools out there that can help you conduct keyword research and analysis. They range from free to hundreds of dollars a month. The problem with most of them is that they’re extremely in-depth and confusing, especially if you’re not a SEO professional.
That’s why we’re going to provide you with some simple solutions that you can use in your keyword research and analysis.
Keyword research is about focusing on searcher intent.
Searcher intent is simply, “What is your audience looking for?”
What is the reason why people conduct a specific search?
- Why are they searching in the first place?
- Are they searching because they have a question and want to find an answer?
- Are they searching for a specific website?
- Are they searching because they want to buy a product or a service?
Over the years, Google has become more and more able to determine the search intent of people. And Google wants to rank pages highest that fit the search term as well as the search intent of a specific search query.
That’s why it’s essential to make sure your post or page fits the search intent of your audience. Understanding what your audience is searching for is the key to solid keyword research and analysis.
There are paid tools and free tools both for keyword research and they all different ways, filling in areas where others lack. Understand, you don’t have to use a keyword research tool, but then again, you can also cut your lawn with scissors.
Tools just make it easier. At the end of this chapter, we’ll suggest some keyword research tools (both free and paid) for you to consider. For now, get out those scissors, lets cut some keyword grass.
For a more detailed look at search intent, read our recent post “Search Intent: What Small Business Owners Need to Know in 2020“
Step 1: Generate a massive list of keywords
Before you find keywords with lots of traffic on Google, you first have to develop a list of potential keywords relevant to your business or niche.
Relevance is key.
Don’t waste time and energy trying to rank for keywords that aren’t relevant. Don’t cast too far a net, keep your keywords relevant.
For example. Let’s say that you’re an online baseball cleat retailer in the United States. Some of your relevant keywords might be:
- Buy baseball cleats
- Buy baseball cleats online
- Online baseball cleats store USA
Irrelevant keywords might be:
- Baseball cleat photos
- How to make your own baseball cleats
- Baseball cleat manufacturers
- How to create baseball cleats
You can probably see that the first list of keywords is more relevant to your target audience and their searcher intent. The second list may be related, however, they are unlikely to send customers to your website.
What you want to do (keeping relevance in mind) is to create a list of potential keyword combinations that you can use to find the keywords with a decent amount of traffic each month on Google.
Here are some powerful strategies that you can use while creating the list.
Steal keywords from your competition
We probably should have said borrow and not steal, but you get the idea.
Let your competition do all of the work – Remember you don’t have to be faster than the bear.
There are all sorts of tools out there that exist for this sole purpose. One of the most commonly used tools (it’s simple and free is the Keyword Density Checker.

You just enter a URL into the tool, and within seconds it will scrape a list of one-word, two-word, and three-word keywords that that website has optimized its page for.

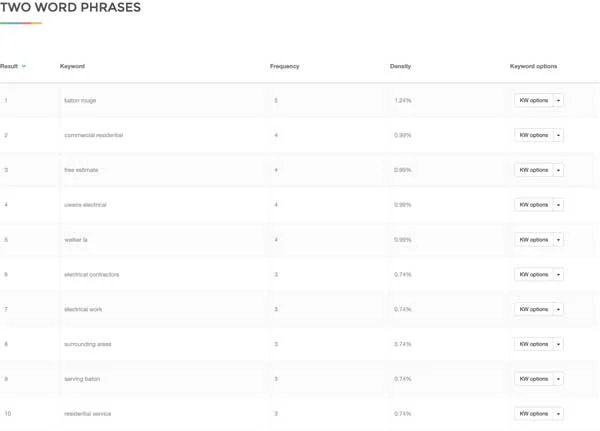

Then, you can export the keywords and put them into a spreadsheet if you want.
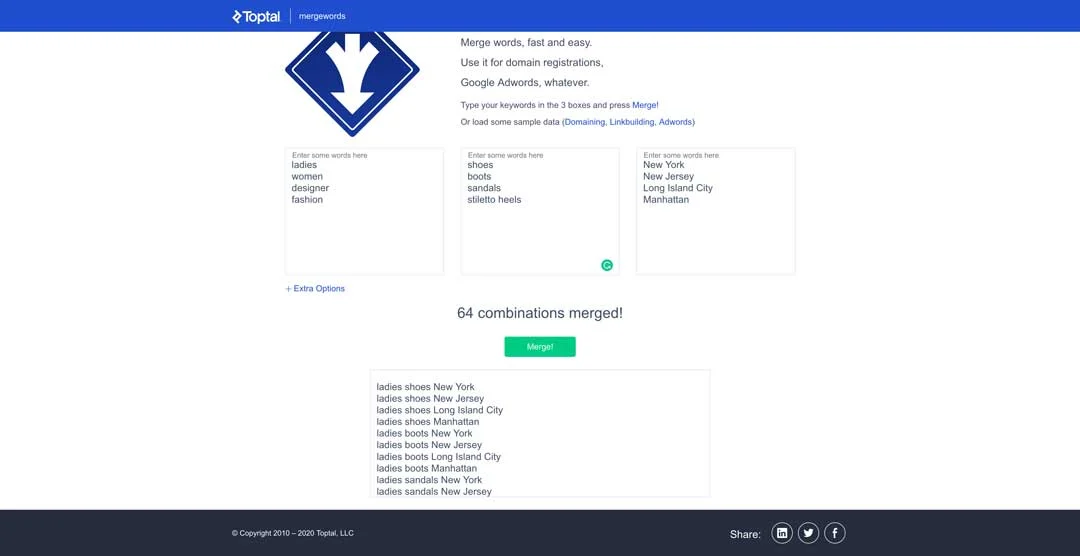
Brainstorm and create your own master list.
Basically, take write out a list of words that your target customer might use in searching. Split them up into columns with different prefixes and suffixes. Then plug them into the tool at Merge Words and get all of the different combinations.
Now that you’ve (hopefully) got a pretty large list of keywords, it’s time to weed through them and pick those that have the potential to be the most effective.
Step 2: Find keywords that will send traffic to your website
Now you’ll want to take your list of keywords and find out how much traffic they are getting through google. Without this search traffic data, you could end up wasting time targeting keywords with zero searches.
One tool you can use is Wordtracker’s Free Keyword Research Tool While it’s not exactly free, you do get something like 10 free searches before you have to “unlock” it.
Type in your keyword, and it shows you search volumes, related keywords, and the keyword’s competition.
The higher the competition, the more difficult it is to rank for the top position for that keyword.
Unfortunately, you’re limited to the number of results it will list, but you can always pay for the tool and unlock more results, searches, and functionality.
Another tool that you can use is a free extension for the Chrome browser called Keyword Surfer. With this extension, you simply enter your keywords into the search bar like you would normally do, and it will show you the search volume for that term.

Now right now you’re probably wondering why each tool shows a different amount of search volume for our seed keyword. Well, each tool uses a different technology in calculating the volume. That’s why you don’t want to blindly trust keyword volume tools, but use them as a guide.
Ok back to Keyword Surfer. On the right-hand side of your page, you’ll see all sorts of other data that you can use in your keyword research including similar keywords, related keywords, and even a cool graph about backlinks related to that term.
A third tool that you can use is UberSuggest.io by Digital Marketing Influencer, Neil Patel. Neil is what some consider the SEO GOAT. Dude’s #legit!
UberSuggest.io works like all of the other tools, and of course, there’s an option to sign up for more functionality. We’ll stick with the free stuff for now.
This tool is an amazing platform for keyword overview, keyword suggestions, keyword difficulty, and competitive intelligence.
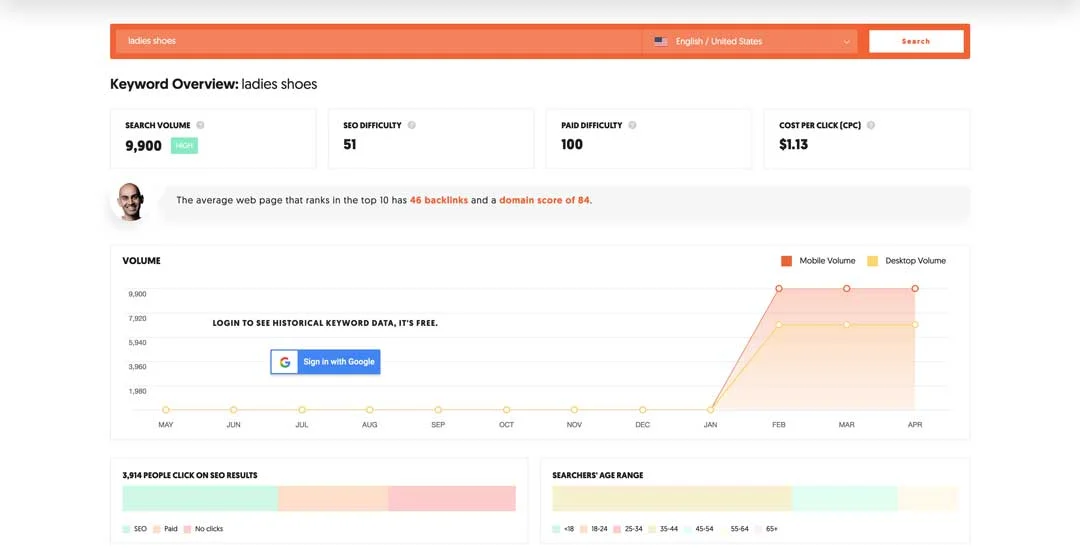
Type in a keyword (or competitor’s website… remember competition research earlier?) and it spits out all sorts of useful data.
Search volume SEO difficulty (the higher the number, the more difficult that keyword is to rank for on the first page of search engines), paid difficulty, and cost per click are listed first.
Then here’s the good stuff: volume. There are also some demographics of those who have searched for the term in the past.
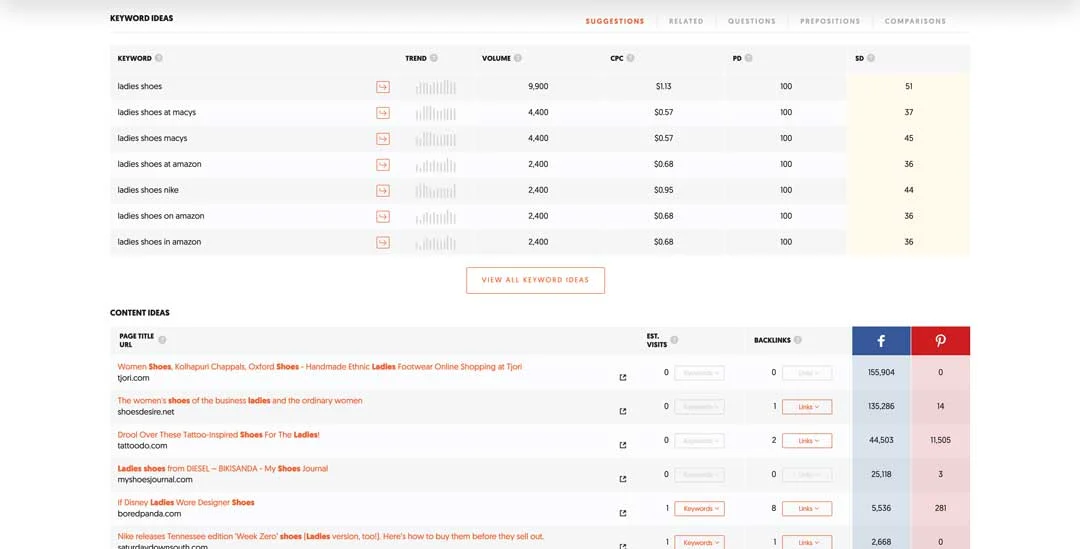
You can even export specific keywords from the list provided into a CSV/Excel formatted list? Click the checkmark on each keyword you would like to export and scroll down to the bottom of the list and click on the “Export to CSV” button.
There’s even some other useful information. Keyword ideas, content ideas, backlinks, and even Facebook and Pinterest information.
As you can tell UberSuggest.io is one of the best free keyword tools out there.
There are also plenty of paid tools that you can use, most with a strong SEO focus such as SEMRush and AHrefs (both are part of our SEO Tool stack we use for our clients.)
Now that you’ve got a good idea of your keywords, now let’s focus on those that we actually stand a chance of ranking for.
Step 3: Find keywords for easy rankings
Let’s face it, there are some keywords that are almost difficult to rank high for. Let’s say you’re a second-hand book retailer and you want to target “book store online.” It’s highly unlikely that you’’ realistically outrank Amazon and Barnes and Noble.
But, perhaps there’s a hidden gem hiding in your keyword list that people are targeting. Something like “antique book stores online.”
This is called a long-tail keyword.
Long-tail keywords are typically three and four keyword phrases that are very, very specific to what you are selling. Whenever a customer uses a highly specific search phrase, they tend to be looking for exactly what they are actually going to buy.
These very specific searches are far more likely to convert to sales than general generic searches that tend to be geared more toward the type of research that consumers typically do prior to making a buying decision.
For more information on Marketing Funnels, hop on over to Neil Patel’s Blog Post – How Marketing Funnels Work. (see, we told you he was a beast!).
So, targeting those long-tail keywords benefits are twofold. We stand a better chance of ranking and those who do visit our site are more prone to buy our products or services.
Click the checkmark on each keyword you would like to export and scroll down to the bottom of the list and click on the “Export to CSV” button. We suggest you export them and stick them into an excel spreadsheet (we use Google sheets.)
Now that you’ve got your spreadsheet with all of your keywords you’ve just got to create awesome content optimized around those keywords to dominate the SERPs. Ideally, you’ll want to find the sweet spot of low competition and high volume. But don’t get too focused on those, instead focus on those that are likely to convert.
If you want to read more about what is a good keyword difficulty score you should aim for, check out the recent post over at Mangools.
Chapter 9 – How to Do Local SEO and Google My Business Account Setup and Optimization
Congratulations! You’ve made it to the final chapter. Hopefully, you’ve left a little in the tank, because we’re at one of the most important steps of this little Local SEO learning experience: Your Google My Business Listing.
The Power of Online Search for Local Businesses
Did you know that 97% of consumers search online for local businesses? This statistic underscores the critical role of an online presence for small businesses looking to thrive in the digital age.
Think about the last time you needed a plumber, a new restaurant, or even a dry cleaner. Did you flip through the Yellow Pages? Probably not. Like most people, you turned to Google or another search engine.
Here’s why this matters:
- Increased Visibility: When your business is optimized for search engines, it’s more likely to appear when potential customers search for services you offer.
- Enhanced Credibility: A well-maintained online presence, complete with updated information, reviews, and engaging content, builds trust with your audience.
- Convenience: Consumers rely on search engines to find businesses nearby quickly. If your business isn’t discoverable, you’re missing out on a significant portion of potential customers.
What Does This Mean for You?
To capitalize on this trend, focus on local SEO and maintain an up-to-date presence on platforms like Google My Business. Include essential details such as:
- Accurate business name, address, and phone number (NAP)
- Positive customer reviews and ratings
- High-quality images and descriptions of your products or services
- Relevant keywords in your content to match local search intent
Investing in these strategies ensures your business appears where people are looking—online. Whether they’re searching for “best coffee near me” or “emergency locksmith,” you’ll be positioned to meet their needs.
What is Google My Business?
Google My Business (GMB) is a free, easy-to-use tool that you can use to manage your business’s online presence and appearance in Google Search and Google maps.
Chances are, you have searched for a business name, and saw their GMB “knowledge panel,” a card containing important information that customers want to know about local businesses.
If you’re on mobile, it will often be the top result before the organic results. If you’re on a desktop, it will be displayed just to the right of the organic and paid search results like this:
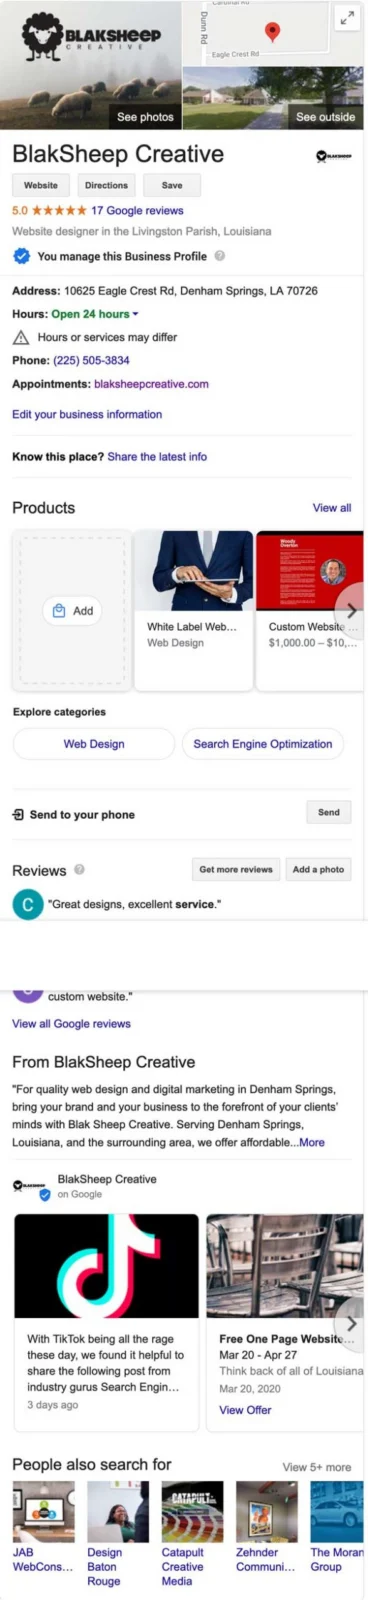
As you see in the picture, the knowledge card displays a lot of valuable information that your customers would want to know such as your business:
- Name
- Type
- Address
- Hours of operation
- Phone Number
- Link to website
- Images
- Link to Google maps
- Reviews
- Overall Star Rating
- Popular times to visit
- Related Searches
- And More
At a quick glance, your customers can learn a lot about your business and whether or not they want to visit it.
That is exactly the reason that Google has this tool: to give customers enough data about a business to help them determine if they want to engage with that business.
What are the benefits of Google My Business?
The benefits of Google My Business are threefold:
- Increased visibility in search
- Better shopping experience for buyers
- More traffic to your website, social channels, and front door
An optimized GMB page helps Google understand more about your business:
- who you are,
- what services/products do you offer,
- where you’re located, and
- what your website is (so they can crawl it for more info).
The more Google knows about you, the more types of searches your Google My Business listing can appear in.
The majority of online searches are conducted through Google. Google typically processes over 4 billion searches every day. (view real-time search data at Internet Live Stats. It’s a pretty cool tool).
Plus, about 90% of all online searches are made on Google.
We’re sure you’ve learned by now that Google is important to people finding your business online. That’s why, if you’re a business owner, it’s important to know about Google My Business and how it impacts SEO ranking, paid search results, and other metrics.
Google My Business is also an important aspect of local search. By simply claiming, verifying, and completing your GMB listing you can easily increase your visibility on organic local search results, Google Maps, Local Finder, and more. This will drive customers to your business (both online and in your physical store.)
Your GMB profile is what’s going to help your business show up when someone searches ‘[business type] near me.’
Considering that one in two people who conduct a local search visit a store that day, and 76% of people who search for something nearby on their smartphone visit a related business within a day?

Look at the image above, and you’ll see how “near me” searches have picked up in the past 2015 to 2020.
Usually, when people type the name of your business, it often displays your knowledge panel alongside your website links (if it doesn’t, try adding your location into the search).
But, when Google knows more about what you do and sell, they can help match you with other types of search queries; the most valuable of these is Google’s Three-Pack.
If you were searching for used cars in Baton Rouge, Louisiana, you’d probably come across a result like this:
Which one would you pick? Why?
We would pick (or at least look more into) Prestige of Baton Rouge and here’s why:
- Although they’re second and have fewer reviews than the third result, their overall star rating is better.
- Now, because of the current COVID-19 crisis, their hours are a little wonky, but it’s still checking them out.
- Although they’re not the closest to Denham Springs, they’re still relatively close. More on that later.

Now, if you click on their small business card, you’ll be taken to the map and their GMB knowledge panel.
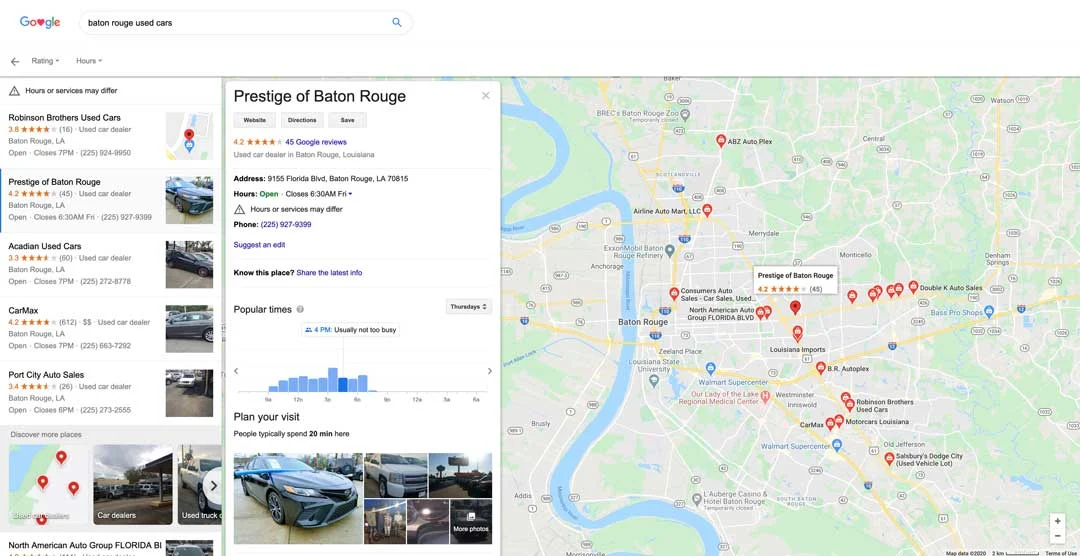
You’ll also see on the map that they’re not even the closest to us in Denham Springs, but they are still pretty close to me (proximity matters in a lot of local searches).
As a matter of fact, in the next image, you’ll see quite a few businesses (pins on the map) that are closer to me (Google uses your GPS location in showing the search results).
So why aren’t the closest businesses shown first?
Take a look at the dealership that we’ve outlined with a red box on the right. Double K Auto Sales is actually geographically closer to us, but they’re not even on the list on the left. Why?
Their GMB profile isn’t correctly optimized. Stay with us here.
Louisiana is the only state in the United States that uses parishes instead of counties. The red arrow on the image is right at the border of East Baton Rouge Parish (on the right of the arrow) and Livingston Parish (on the left of the arrow).

Double K is actually located in Livingston Parish, but if you look at the red box under their name, you’ll see that they have entered the wrong Parish.
Google is fickle. Something as simple as incorrect location information can destroy your Local SEO.
We’ll explain more about having correct and consistent information everywhere in your digital footprint in a minute.
What are the features of Google My Business?
Here are some of the most popular features that Google My Business offers business owners… for free!
Insights: Your personal dashboard will provide you insight into customer activity and interaction, allowing you to learn what’s working, and what isn’t on your listing. You can also understand your community to target new customers:
- How did searchers find your business?
- Where did they come from?
- How are your photos performing?
Google My Business insights gives you answers to these questions and will help your small business optimize and improve over time.
Posts: With GMB’s post feature, you can post updates and offers on your local listing. You can make these updates via Google’s easy web interface, or use the GMB app to make them while you’re on the go.
Easily posting custom updates and offers on your local listing is a breeze. Updates can be made anytime from your phone, tablet, or computer for on-the-go maintenance. Not sure what to post about? You can post things like limited-time offers, contest promotions, and partnership announcements – anything to engage your customers.
Bookings: Allow your customers to book your services or schedule an appointment directly from your listing by simply clicking a button.
Review Management: 91% of consumers read online reviews, and 84% of people trust reviews as much as personal recommendations from friends. Plus, according to Search Engine Watch, online reviews are estimated to make up 10% of the criteria for how Google displays search results. Reviews not only help you interact with your customers, and learn how your customer service efforts are performing, but they’re a pretty powerful SEO tool as well.
Q&A: Customers can ask questions about your business, and you can reply. You can even pin frequently-asked-questions (FAQ) to your listing for easy viewing.
Photos: Strong visuals are important for good first impressions—and they’re a surefire way to a more well-clicked business listing. Google My Business allows you to upload your best photos and videos to entice customers to visit you.
Research shows that 60% of consumers have searched for a business at least six times in the last year. Google My Business could help you become a more accurately represented, visible, and visited business.
Now that you’ve seen the benefits of a GMB listing, you’re probably chomping at the get one for your business. Now let’s get your GMB listing setup.
How to set up your GMB page
Step One: Log in to the Google account you want to associate with your business.Step Two: Visit Google My Business and click “Manage Now” to get started.
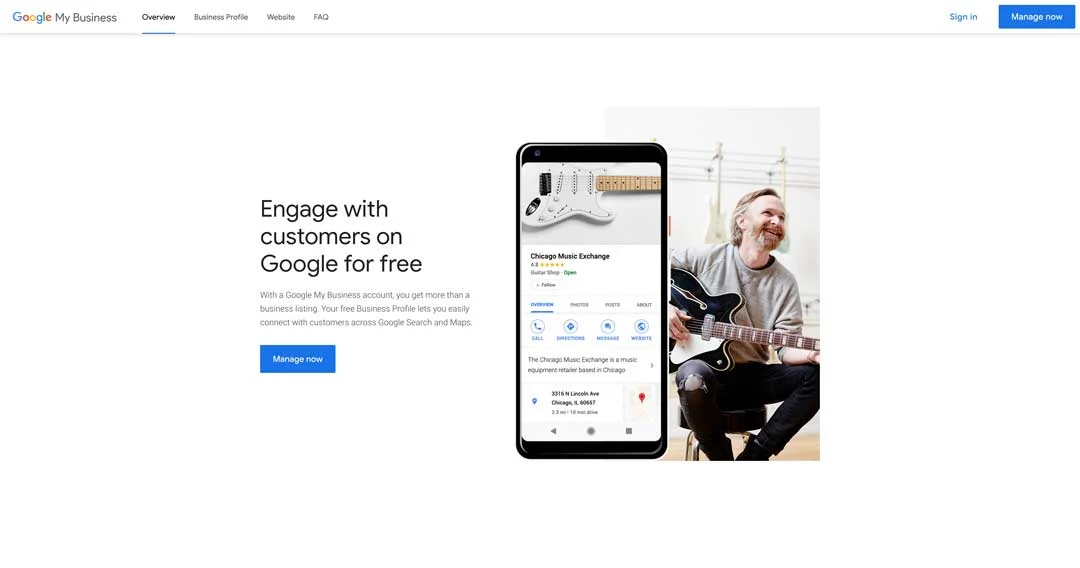
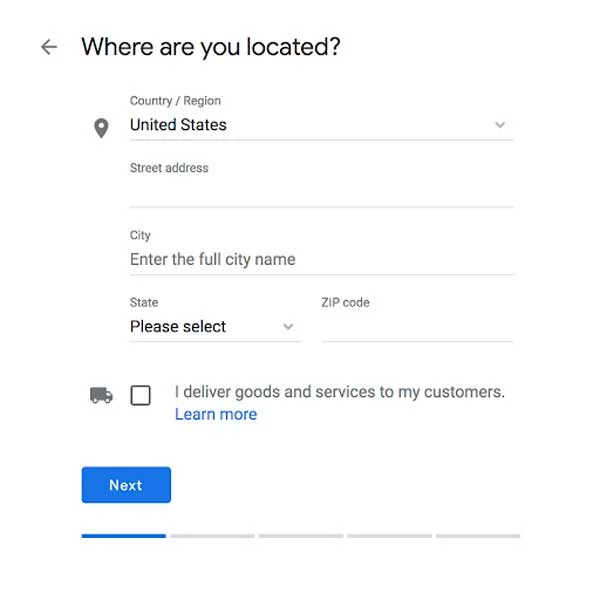
Step Four: Enter the address of your business and select your service area.
Step Five: Select the category that best fits your business. You can choose up to 10 categories to show off all of your services, however, you can only choose one primary category, which Google gives the most weight to. So choose your primary and secondary categories wisely.
Step Six: Enter your company’s contact information.
Step Seven: Verify your business. There are a few different ways to do this, and Google has instructions on each method. Typically they’ll mail you a postcard in the mail within a couple of days after submitting your business. This postcard will have a verification code that you’ll have to type in on your dashboard, and voila!
Now that you’ve filled out and verified your GMB listing, you’re done, right?
Oh no, you’re just getting started. Now it’s time to optimize your listing.
How to Optimize Your Google My Business Listing
Having a GMB listing is pointless if it doesn’t bring you more business? Now that you’ve got your business verified, you need to visit your Google My Business dashboard and start updating info, uploading photos, and providing potential customers with useful information, like your business hours and attributes (e.g. free wifi, kid-friendly).

Showing you step-by-step how to set up and optimize your GMB listing would take a whole other tutorial. We are going to show you the basics and the general idea.
Here’s the secret to a properly optimized GMB profile – fill out everything!
We’re going to go down that list on the left to tell you some of the most important to fill out right now. You’ll need to double back and finish all of the others on your own. Most are self-explanatory.
Complete your business Info
Previously on GMB, the easiest way to tell Google (and searchers) about your business was through the Google My Business category list (there are nearly 4,000 options now.) Luckily, Google now gives you 750 characters (~250 characters before the “Read More” separator) for you to use to describe your products, services, value, or whatever you want to communicate to your audience.
Need help creating or optimizing your GMB listing? We’re here to help. If you already have an optimized GMB listing, make sure to optimize it for “near me” searches for local SEO success.
We suggest you make full use of every character, with a description between 730-750 characters.
Every sentence, phrase, word, or character tells the buyer more about your business.
Descriptions also help you improve your search rankings in Google.
Upload your Images
Here are some statistics regarding photos on your GMB listing straight from Google:
“Businesses with photos receive 42% more requests for driving directions to their location from users on Google, and 35% more clicks through to their website than businesses that don’t have photos.”
Would you rather potential customers visit your location rather than your competitors’?
Add some photos!
Let’s say you were looking to buy a new dog for your children from a local pet store.
One pet store’s GMB listing only shows their storefront, their logo, and their Google Street View; how likely are you to load up the kids and drive over there right away?
But if you were able to see images of their showroom, see up-close pics of the available animals, and pics of the store’s employees that you may encounter, you’re going to feel more confident in your expectations when you visit them, right?
If you sell products you have to showcase your products on your GMB listing.
Also, include interior pics of your office/showroom. Take some exterior pics of your building so buyers know which building is yours, or show them how big your showroom is. Upload pictures of your team so people know who to look for when they come in.
Other people can upload images to your Google My Business page too, and you should encourage your customers to do so.
Just be sure to moderate them. You may find images that you want to remove such as:
- Images posted by mistake that have nothing to do with your business
- Poor quality images you might not want representing your business
- Images that may be offensive to some or should remain private
Encourage and respond to reviews
The reviews on your GMB page can be a deciding factor in whether a buyer chooses your business, or moves along to your competition. Check out some of these statistics about Local Consumer Reviews:
- 97% of consumers look online for local businesses.
- 85% of consumers trust online reviews as much as personal recommendations
- 73% of consumers trust a local business that has positive reviews more
- 68% of consumers have left a local business review when asked
- 30% of consumers say they’ve judged a business based on its responses to reviews
People look to others for their opinions before making a purchase decision. They want to learn from the experiences of those who have purchased before.
Was their buying experience a positive or negative experience? What’s the chances that their experience will be the same?
30% of consumers say they’ve judged a business based on its responses to reviews
Remember that statistic from earlier? Not responding is a response right?
Always respond to your reviews, whether they’re positive or negative.
Positive reviews give customers a good impression of your business and are usually easy to respond to.
Negative reviews on the other hand…
But what do you do about the inevitable negative review and one-star rating?
Some businesses simply ignore them and hope they’ll go unnoticed. Even words, some reply in a way that ends up being a big public knockdown-drag out-keyboard-fight. No one benefits from that kind of response. Especially your business.
But, you have to respond to the reviews. Both the person who left the review and the people reading it benefit.
Remember Double K Auto Sales from earlier? The one that didn’t show up in our search, even though they are closer to Denham Springs?
Well, not only is their GMB profile setup wrong geographically, but there’s this:

There’s a one star rating along with a scathing review of the business. And they didn’t even bother to respond. Not only does their lack of response destroy their standing with Google (Google takes note of reviews, and factors them into search results.), it makes them look pretty crummy as a business.
How quickly would you press the back button and move ahead to the next business?
Instead, what Double K should have done is calmly and rationally explained the situation and calmly offered to provide a resolution.
The reviewer would probably have felt better about his situation, having gotten to vent, be heard, and get a helpful response.
Now let’s hop back up to posts.
Promote events, offers, and content with posts
In June 2017, Google rolled added Google Posts to business profiles. Prior to this, if you wanted to share your content, you had to do it on your website and social media platforms.
But in 2020, you can have your content show up on both Google Search and Google maps in your business’ knowledge panel.
Here’s some of the types of content you can create:
- Blog articles
- Company news
- eBook downloads
- Upcoming events
- Special offers
- Product promotion
Or anything else you want buyers to know about you, your products, and your services.
Promote your Event
You can let your audience know that you are having an event. Do an event trifecta and promote it all over your website, social media channels, and create a Google My Business post.
When people click your post, you can send them to a special landing page with all of the awesome details about your event..
Create a special offer:
Here’s a quick example of a special offer post:

This is a special offer that we had for free website SEO audits to help businesses improve their organic search results. (which consequently is still active and you can get your free seo audit also.)
Don’t take our word about the impact Google posts can have on your audience, read it straight from Google:
“Seventy percent of people look at multiple businesses before making a final choice. With Posts, you can share timely, relevant updates right on Google Search and maps to help your business stand out to potential customers. And by including custom calls-to-action directly on your business listing, you can choose how to connect with your customers.”
Upload videos
Videos are perhaps the best way to attract, engage, and communicate with your buyers.
Video marketing is here to stay and It’s powerful. If your business isn’t already leveraging it, you better get filming.
And once you’ve got some awesome marketing videos to share, why not upload a few to your Google My Business page?
Google My Business offers two ways to promote video:
- Upload videos to photos (once you click the “upload” button, it’ll ask if you want to upload a photo or a video)
- Upload videos as a post
Upload videos to photos
This one is pretty easy. Just upload the video and that’s it.
Upload videos as posts
There’s another way to promote your videos through GMB rather than have it get buried amongst your images; you can upload a video as a post.
Here’s an example of an explainer video we created back in 2019 titled, “Web hosting for dummies.”
What’s awesome about videos on Google My Business pages is that, as people are scrolling through a business’ GMB photos, the videos autoplay to grab their attention.
Plus, you can natively upload a video as a Google Post and have it viewed directly on your GMB knowledge card.
Try it for yourself and take some of the videos you already have and upload them to your GMB page.
This only fakes a few minutes but could be the deciding factor in whether a potential customer decides to purchase your products or services or move along to your competitor.
Free Advertising with Google Posts
Google Posts are small, digital advertisements that show up in Google’s search results that can serve as an extension of your company’s website.
We’ve already discussed images, videos, events, offers, etc.
Now let’s talk about plain old posts.
In the GMB post dashboard, you can create posts about anything you want to.
Do you have a sale going on or maybe you’re releasing a new product? Use Google Posts that provide links directly going to the post on your company website or CTA (Call To Action) area.
- Learn more about Call to Actions in our recent post Your Website Call to Action – You Have to Ask.
Or you can also use Google Posts for simple and personable messages such as a thank you to your customers.
Google Posts remain “live” for only seven days. Once an event is over, the post will “go dark”. You will receive a reminder about creating a new post in order to stay relevant and up-to-date as well.
Google posts will improve your rankings.
GMB’s Call-to-Action Button Feature

Every business owner, large or small, must realize the power of call-to-actions, especially “booking” CTA buttons.
Google has a “Booking” button helps you to accomplish just that.
If your customers make appointments you can use this feature to book an appointment directly from your GMB listing.
Or you can direct the button to a form on your website where they can sign up, contact you, or whatever you want their action to be.
Allow Customers to Send You A Text Message
You can use Google Messaging to allow your potential customers to reach you directly.If you don’t want to list your personal cell phone number, you can download Google’s “Allo” app.
Keep in mind: When setting up your Allo account, it must match the phone number listed on your GMB listing.
Now, when a potential customer sends you a message, Allo sends a notification instead of the message appearing in your normal SMS provider. Currently, this feature is only available to mobile web users, not mobile app or desktop users.
Answer your customer’s questions
The new Questions & Answers feature is new to Google’s local search but is very useful. Just like a website’s FAQ section, the Q&A feature allows people to ask questions about your business and you can answer them directly.
Answering questions in a timely fashion will ensure optimal success for your local business.
Local SEO Citations & NAP
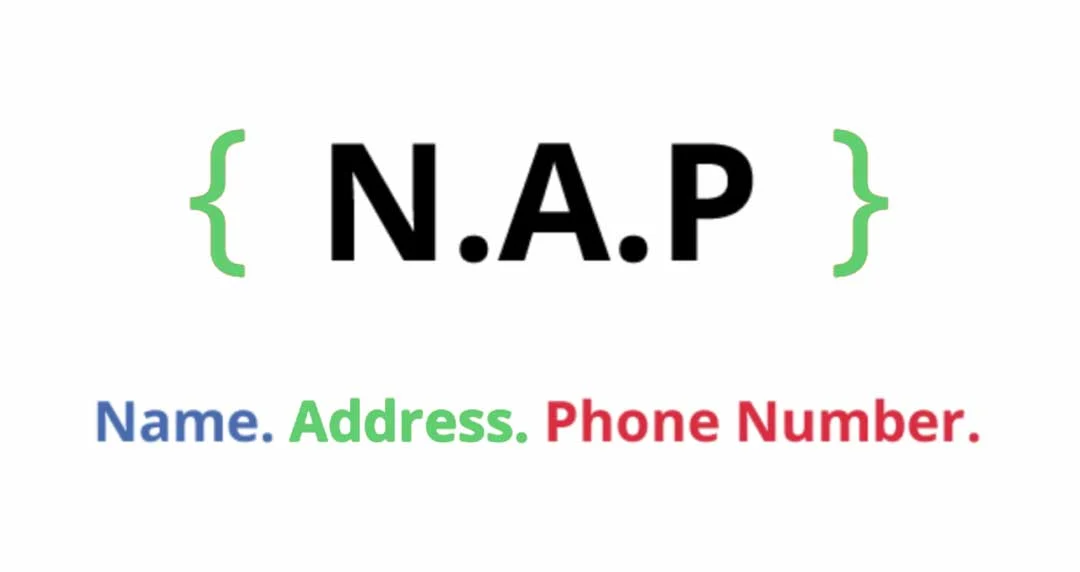
What are Local SEO Citations? Basically, citations is an SEO-nerd way to say “directory.”
For example, these directories that you’re probably familiar with are considered “citations.”
- White Pages,
- Yellow Pages
- HomeAdvisor
- Thumbtack
There is a multitude of benefits to being found in a citation network but we’re only going to focus on the few important ones in this guide.
Moz definition of the term “Local Citation” or “Local Business Citation”:
“A local citation is any online mention of the name, address, and phone number for a local business. Citations can occur on local business directories, on websites and apps, and on social platforms. Citations help Internet users to discover local businesses and can also impact local search engine rankings. Local businesses can actively manage many citations to ensure data accuracy.”
Why are local citations important?
Local Citations significantly influence two scenarios for local businesses:
- Accurate local citations can have a positive effect on local search engine rankings.
Local search engine rankings are directly affected by the number of citations a business has, the accuracy of the data in each citation, and the quality of the citation network.
If each citation is accurate and is on a high-quality network, search engines place more trust in the citation – your search engine results go up!
If a business has too few citations and the information is not accurate search engines place less trust in the business – your search engine results go down!
- Accurate local citations can have a positive effect on customers.
The more accurate the listing and the more trustworthy the directory increases trust in consumers which increases web traffic, phone calls, and foot traffic to your store. This increases sales, and sales increase your profit. increasing web traffic, phone calls, and foot traffic, which can all attribute to more transactions.
The inverse is also true. Citations that lack accuracy can lead to loss of reputation and revenue.
What are the types of local citations?
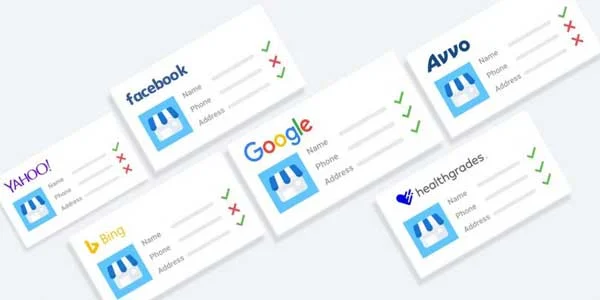
There are currently three types of local citations:
- Major Local Business Data Platforms: The bigger core platforms such as Google My Business, Acxiom, Localeze/Neustar, and Infogroup). Listings can also also be built on popular social and review-oriented networks such as Facebook and Yelp.
- Geo/Industry-Specific Platforms: Listings that are centered around a specific industry and its geography). Examples of these are the Chamber of Commerce and professional associations.
- Supplementary Citations: Citations that are typically built or earned on the wider web via publications such as blogs, news sites, applications, maps, government databases, etc.
Citations can be built or earned by filling out forms directly on local business platforms manually or can be created through various other marketing methods.
Citations can also be automatically built through automated aggregation with services such as Yext or Brightlocal. The downside to these is that your citations tend to disappear when you discontinue using their services.
No matter how you go about gaining citations for your business, the accuracy of your NAP (name, address, phone number) data is highly important in these cases because it can directly benefit or negatively impact your Local SEO efforts.
What are the parts of a local citation?
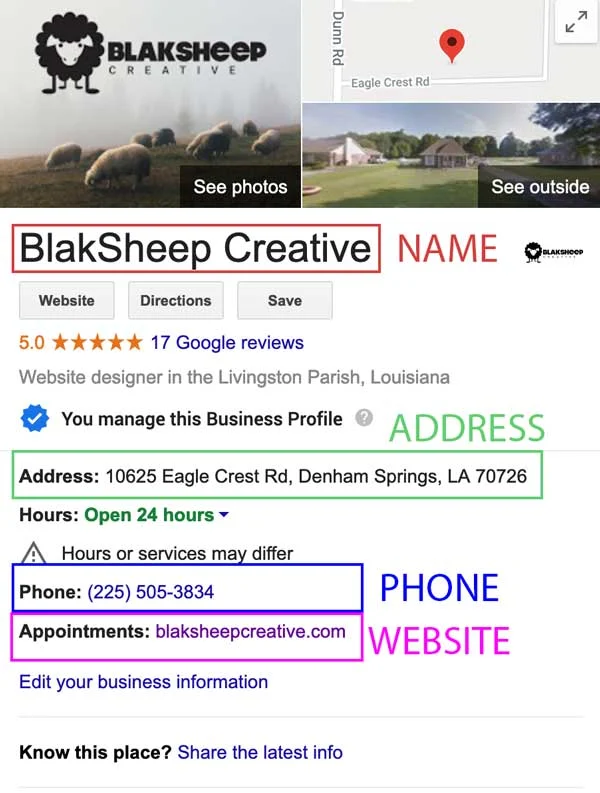
As we mentioned earlier, the accuracy of your NAP (Name, Address, and Phone Number) information is critical – this information makes up the main components of a local citation.
If at all possible, you should have a link to your homepage or a service page on your website.
Here are a few other elements that a citation may also contain:
- Business description
- Business categories
- Taglines
- Hours of operation
- Driving directions
- Geo-coordinates
- Images
- Videos
- Payment forms accepted
- Reviews
- Owner responses
- Email addresses
- Fax numbers
- Alternate phone numbers
- Links to social and other forms of media
- Attributes
Citations: focus on the 3 “R’s”:Rankings, Reputation, and Revenue.
Local Citations are basically a way of publishing your business information on the world wide web. Each citation can influence your visibility with consumers as well as your local search engine rankings.
The more accurate the information in the citation, the better your chance of success. The less accurate the data, the more prone you will be to lose rankings, reputation, and revenue.
That’s why you need to focus on what’s called an Active Location Data Management strategy to make sure that all of your citations are up to date and the information in them is correct.
Here’s a quick guide from Moz Local on where to get some easy and reputable citations. While you’re at it, check out some of our citations.
Did you know that Google Maps listing is also considered a citation? Keep it up to date and accurate to see the best Local SEO results.
If at all possible, embed your company’s focus keyword in your Google Maps/My Business listing as well. You see, when Google and other search engines see consistent data, they’ll connect the dots and they’ll know that you’re a legitimate business.
How should I display NAP information on my website?
Properly displaying your business NAP information is actually one of the most commonly overlooked areas during a website design or development. Without the proper NAP information on your company’s website, you could be missing out on serious web traffic (and even revenue).
Here are 3 easy steps you can take to make sure your NAP is on your website.
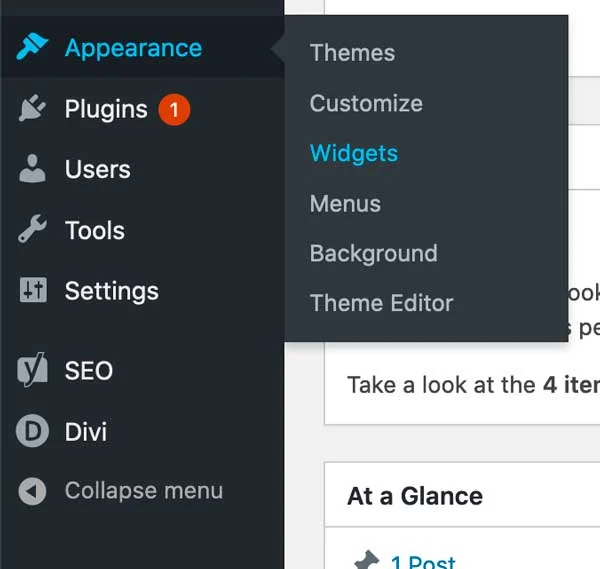
Step 1: Find the “Appearance” tab on the left-hand side of your WordPress Dashboard and click on “Widgets” in the floating menu. View the image below for reference:
Step 2: In the “Widgets” module, you can edit your website’s Footer area by entering information into each “Footer Area” tab.
For this tutorial, let’s add your Name, Address, and Phone Number information in the Footer Area #1 tab.

First, let’s remove Wordpress’s default footer items.
Click on the arrow next to where it says “Footer Area #1,” and one at a time click the down arrow on each of the items (in this case Archives, Categories, and Meta) and press delete to get rid of them.
Now, drag a text widget from the left hand side into “Footer Area #1”.

Now, just fill out your Business’s name, address, phone number, and whatever other information you’d like listed on the footer (on every page of your website).
Make sure it’s exactly the same as elsewhere on the internet.

Bonus points if you go ahead and make your address a link to Google Maps (just pull up your business address on Google Maps, copy the URL up top, and then create a hyperlink to the URL you copied. Make sure you set it to open in a new window.
Always have external links open in a new window (tab) to make it easy for visitors to come back to your site.
Now do the same for your telephone number. Make it easy for potential customers to call you by hyperlinking your phone number in your footer. If you don’t know much about HTML, simply create a standard hyperlink, but put in your phone number this format: tel:XXXXXXXXXX (replace the Xs with your phone number.). See the image above for guidance.
We highly recommend adding your Hours of Operation in a separate footer widget as well. This widget will automatically appear at the bottom of each page on your website.
The more accurate your NAP information, the better.
Congrations, you’re finished!
I hope our “Super Easy SEO Guide for Small Businesses” will help provide you a good start to your Local SEO journey.
Our intent is to make a “part 2” of this guide, where we will dig in to some more advanced SEO tips and tricks.
It is our hope that this was not just another “Local SEO Guide” but was one that you were able to learn from, having learned nothing about SEO coming in.
If you enjoyed this guide, please share it with your friends, family, coworkers, or other small business owners that you feel could benefit from it and get a little marketing boost.
Yes, there are other “Local SEO Guides” out there; this is true.
Still have questions? Feel free to reach out to us via email at seo@blaksheepcreative.com or you can find us on Facebook, Twitter, Instagram, or LinkedIn.
Wondering whether your SEO is actually getting traction — or where to focus next? Let’s diagnose it in a 15-minute Discovery Call.